Back in the days of film photography, different film stocks would leave different levels of grain in photos, an aftereffect of the chemical process involved in film exposure. Enter the digital camera, and photographers had something new to contend with: noise. Noise is a byproduct of the exposure process that results in variations in image color and brightness. It's also something that many photographers try to avoid in their photos. While digital noise and film grain appear to be analogous, they're different phenomena with very different sources, and digital noise isn't nearly as pleasing or even desirable as film grain can be. So, what causes noise? And how do we test a camera's ability to handle it? Read on to find out.
Test results
What Is "Noise"?
First things first: what do we mean when we talk about image "noise"? Noise, at its most basic, is any unwanted deviation from the signal in a digital image, and it appears as random fluctuations in the brightness and color of your photo. Those little speckled artifacts you see when you take photos in low light? That's noise.
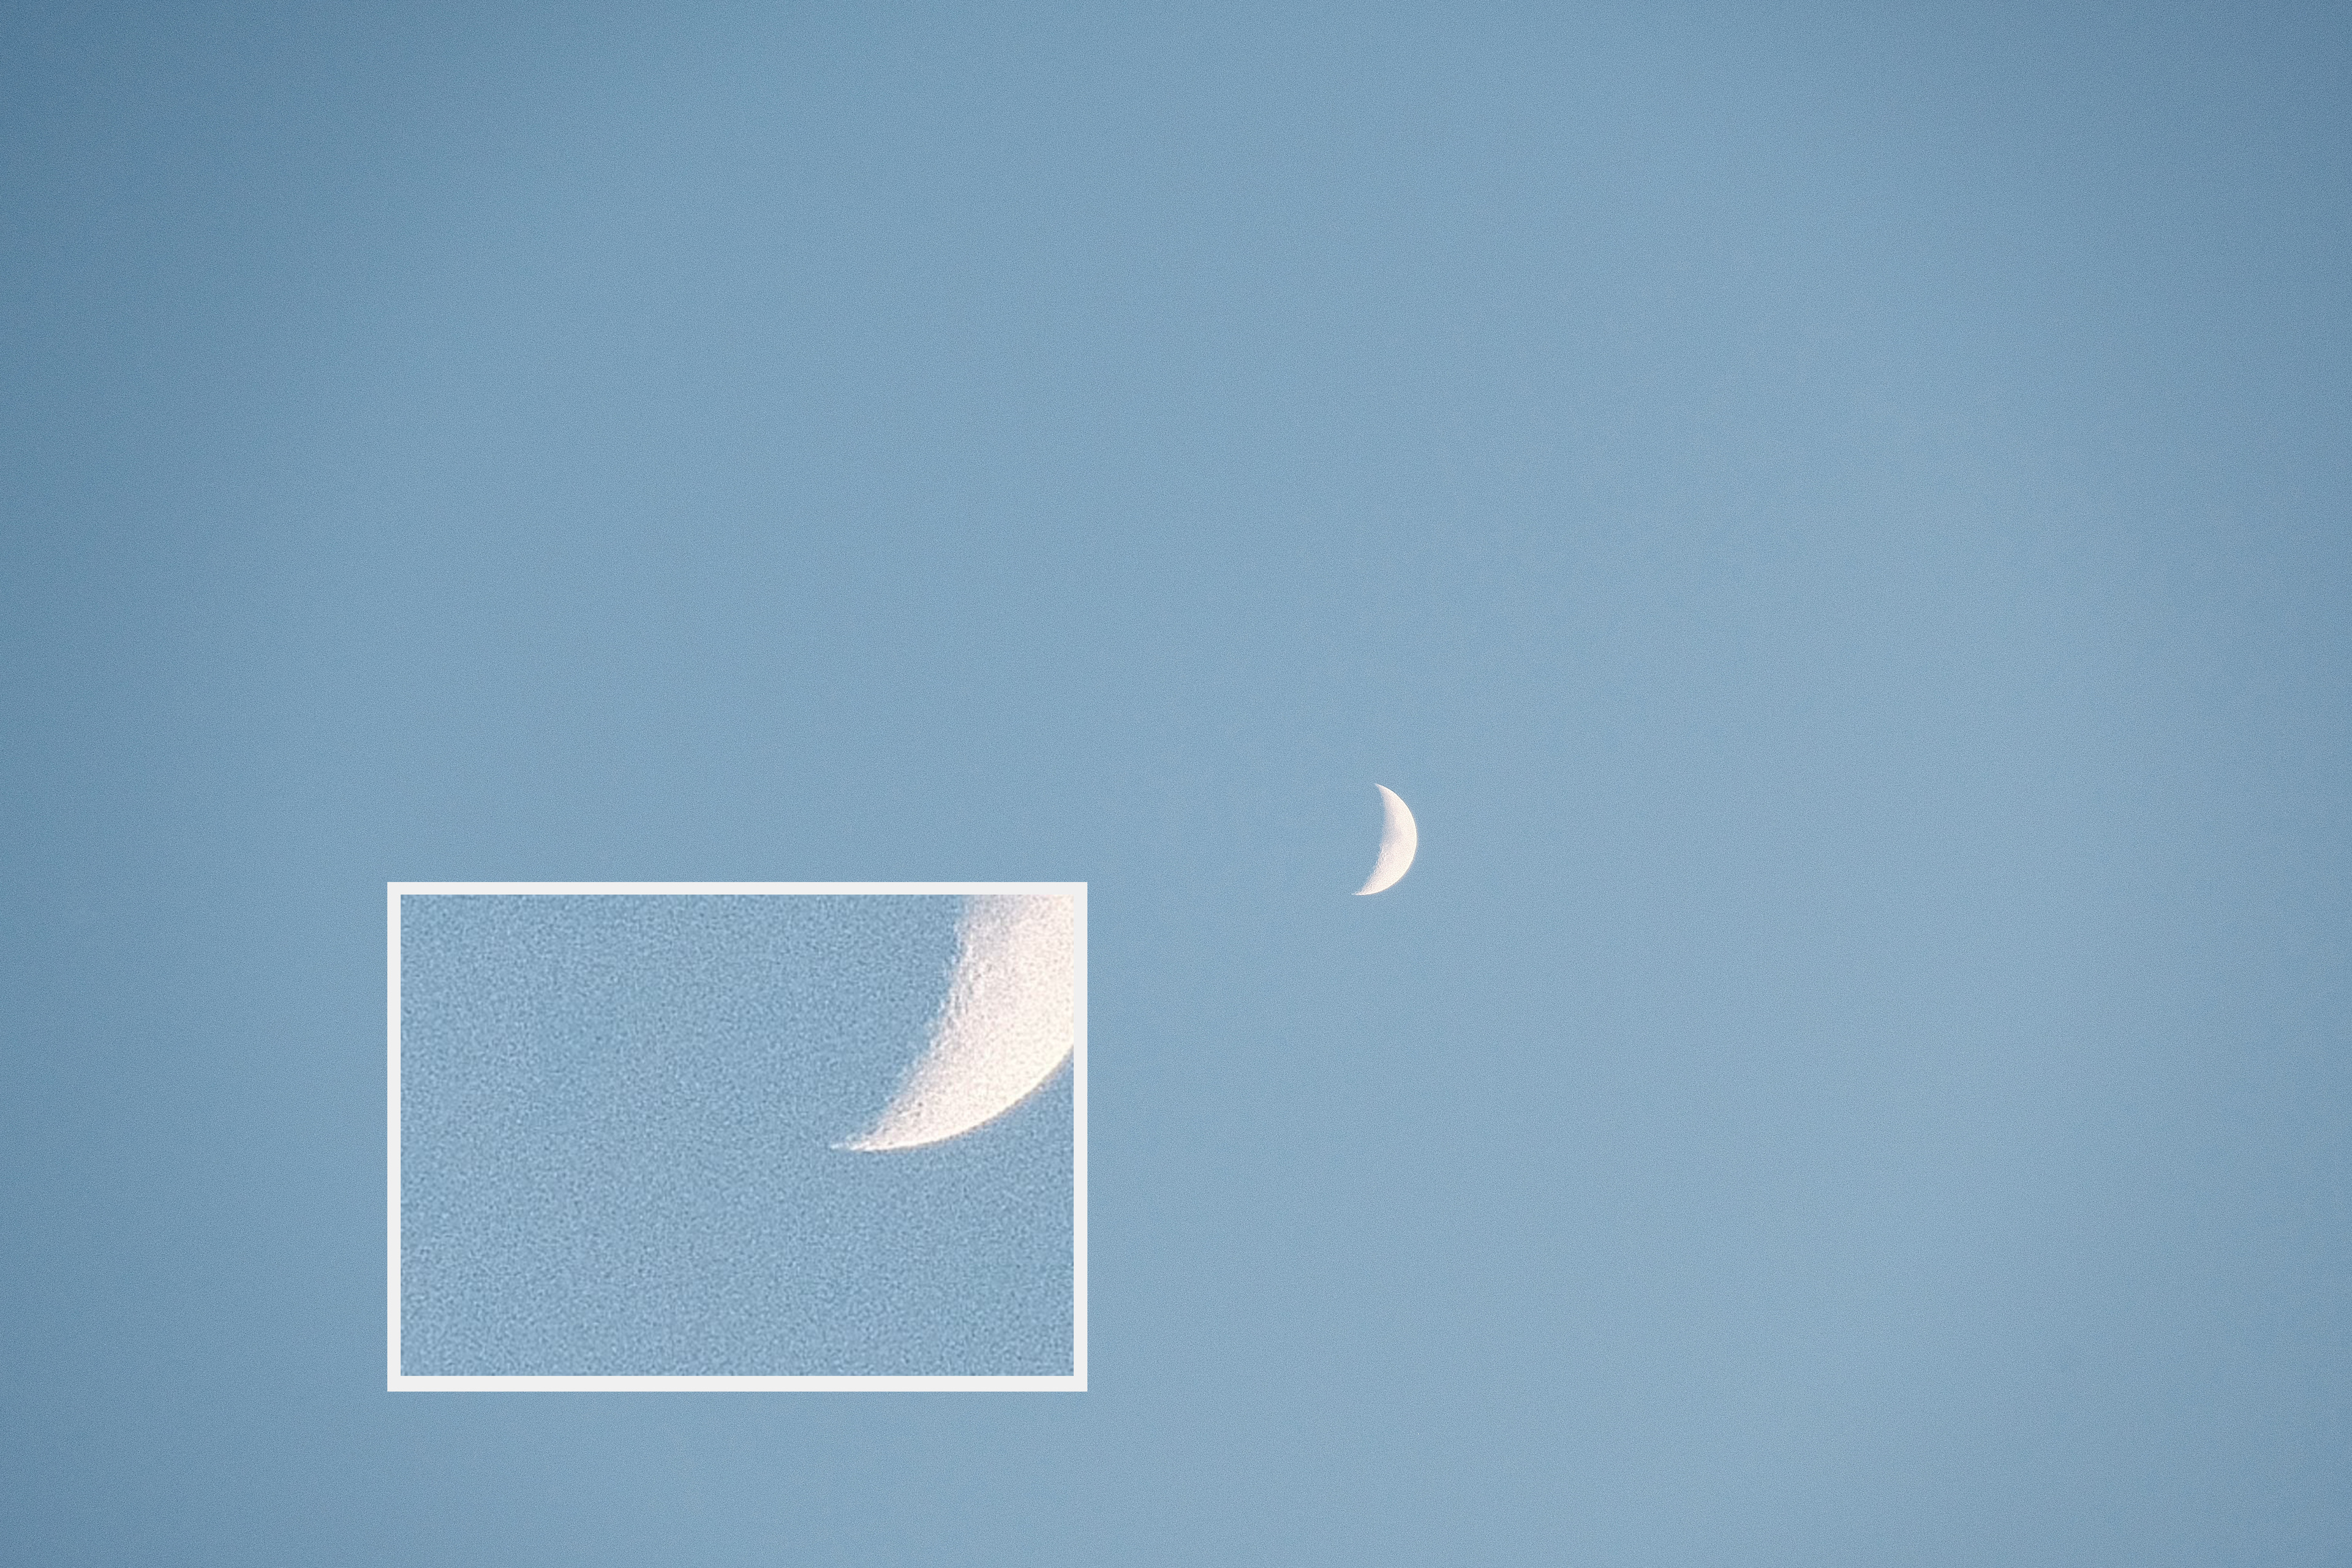 Fujifilm X-H1 + XF 18-135mm f/3.5-5.6 @ 135mm, f/5.6, 1/200s, ISO 1250. Photo by Sophie Arsenault.
Noise is typically measured as a signal-to-noise ratio (SNR), expressed in decibels (dB). In the context of photography, the signal in question is light. A high SNR means there's a greater ratio of signal (i.e., light) to noise, while a low SNR means there's less light relative to the noise. With less signal, the relative amount of noise is typically much greater, which is why noise is more of a problem when shooting in low light. Ultimately, noise is much harder to perceive when there's a stronger signal because there's more light to "drown" it out.
Sources Of Noise
Not all noise is created equal, however. There are different sources of noise in photographs, many of which are beyond the scope of this article. There are two main ones you should be aware of, though, and it's important to make a distinction between them to understand how we measure image noise:
- Photon shot noise: Noise resulting from the inherent randomness of light particles, or photons. Where there's light, there's shot noise, though how much of it you see depends on the brightness of the scene you're shooting and how you expose your image.
- Read noise: Noise resulting from the electronics of the sensor during the readout process. Translating photons into a digital image is a complicated process with a lot of steps, many of which can introduce different kinds of noise. Read noise is a function of sensor hardware and can't be altered.
Both shot noise and read noise play a part in the total noise of an image, among other sources that we haven't delved into here.
When It Matters
Contrary to what you might think, noise is always present in an image; it's just not always visible. It's mostly apparent when taking photos in low light. That's partly because of how light particles, or photons, move. Photons don't move in an even, uniform pattern, which is how shot noise comes into play.
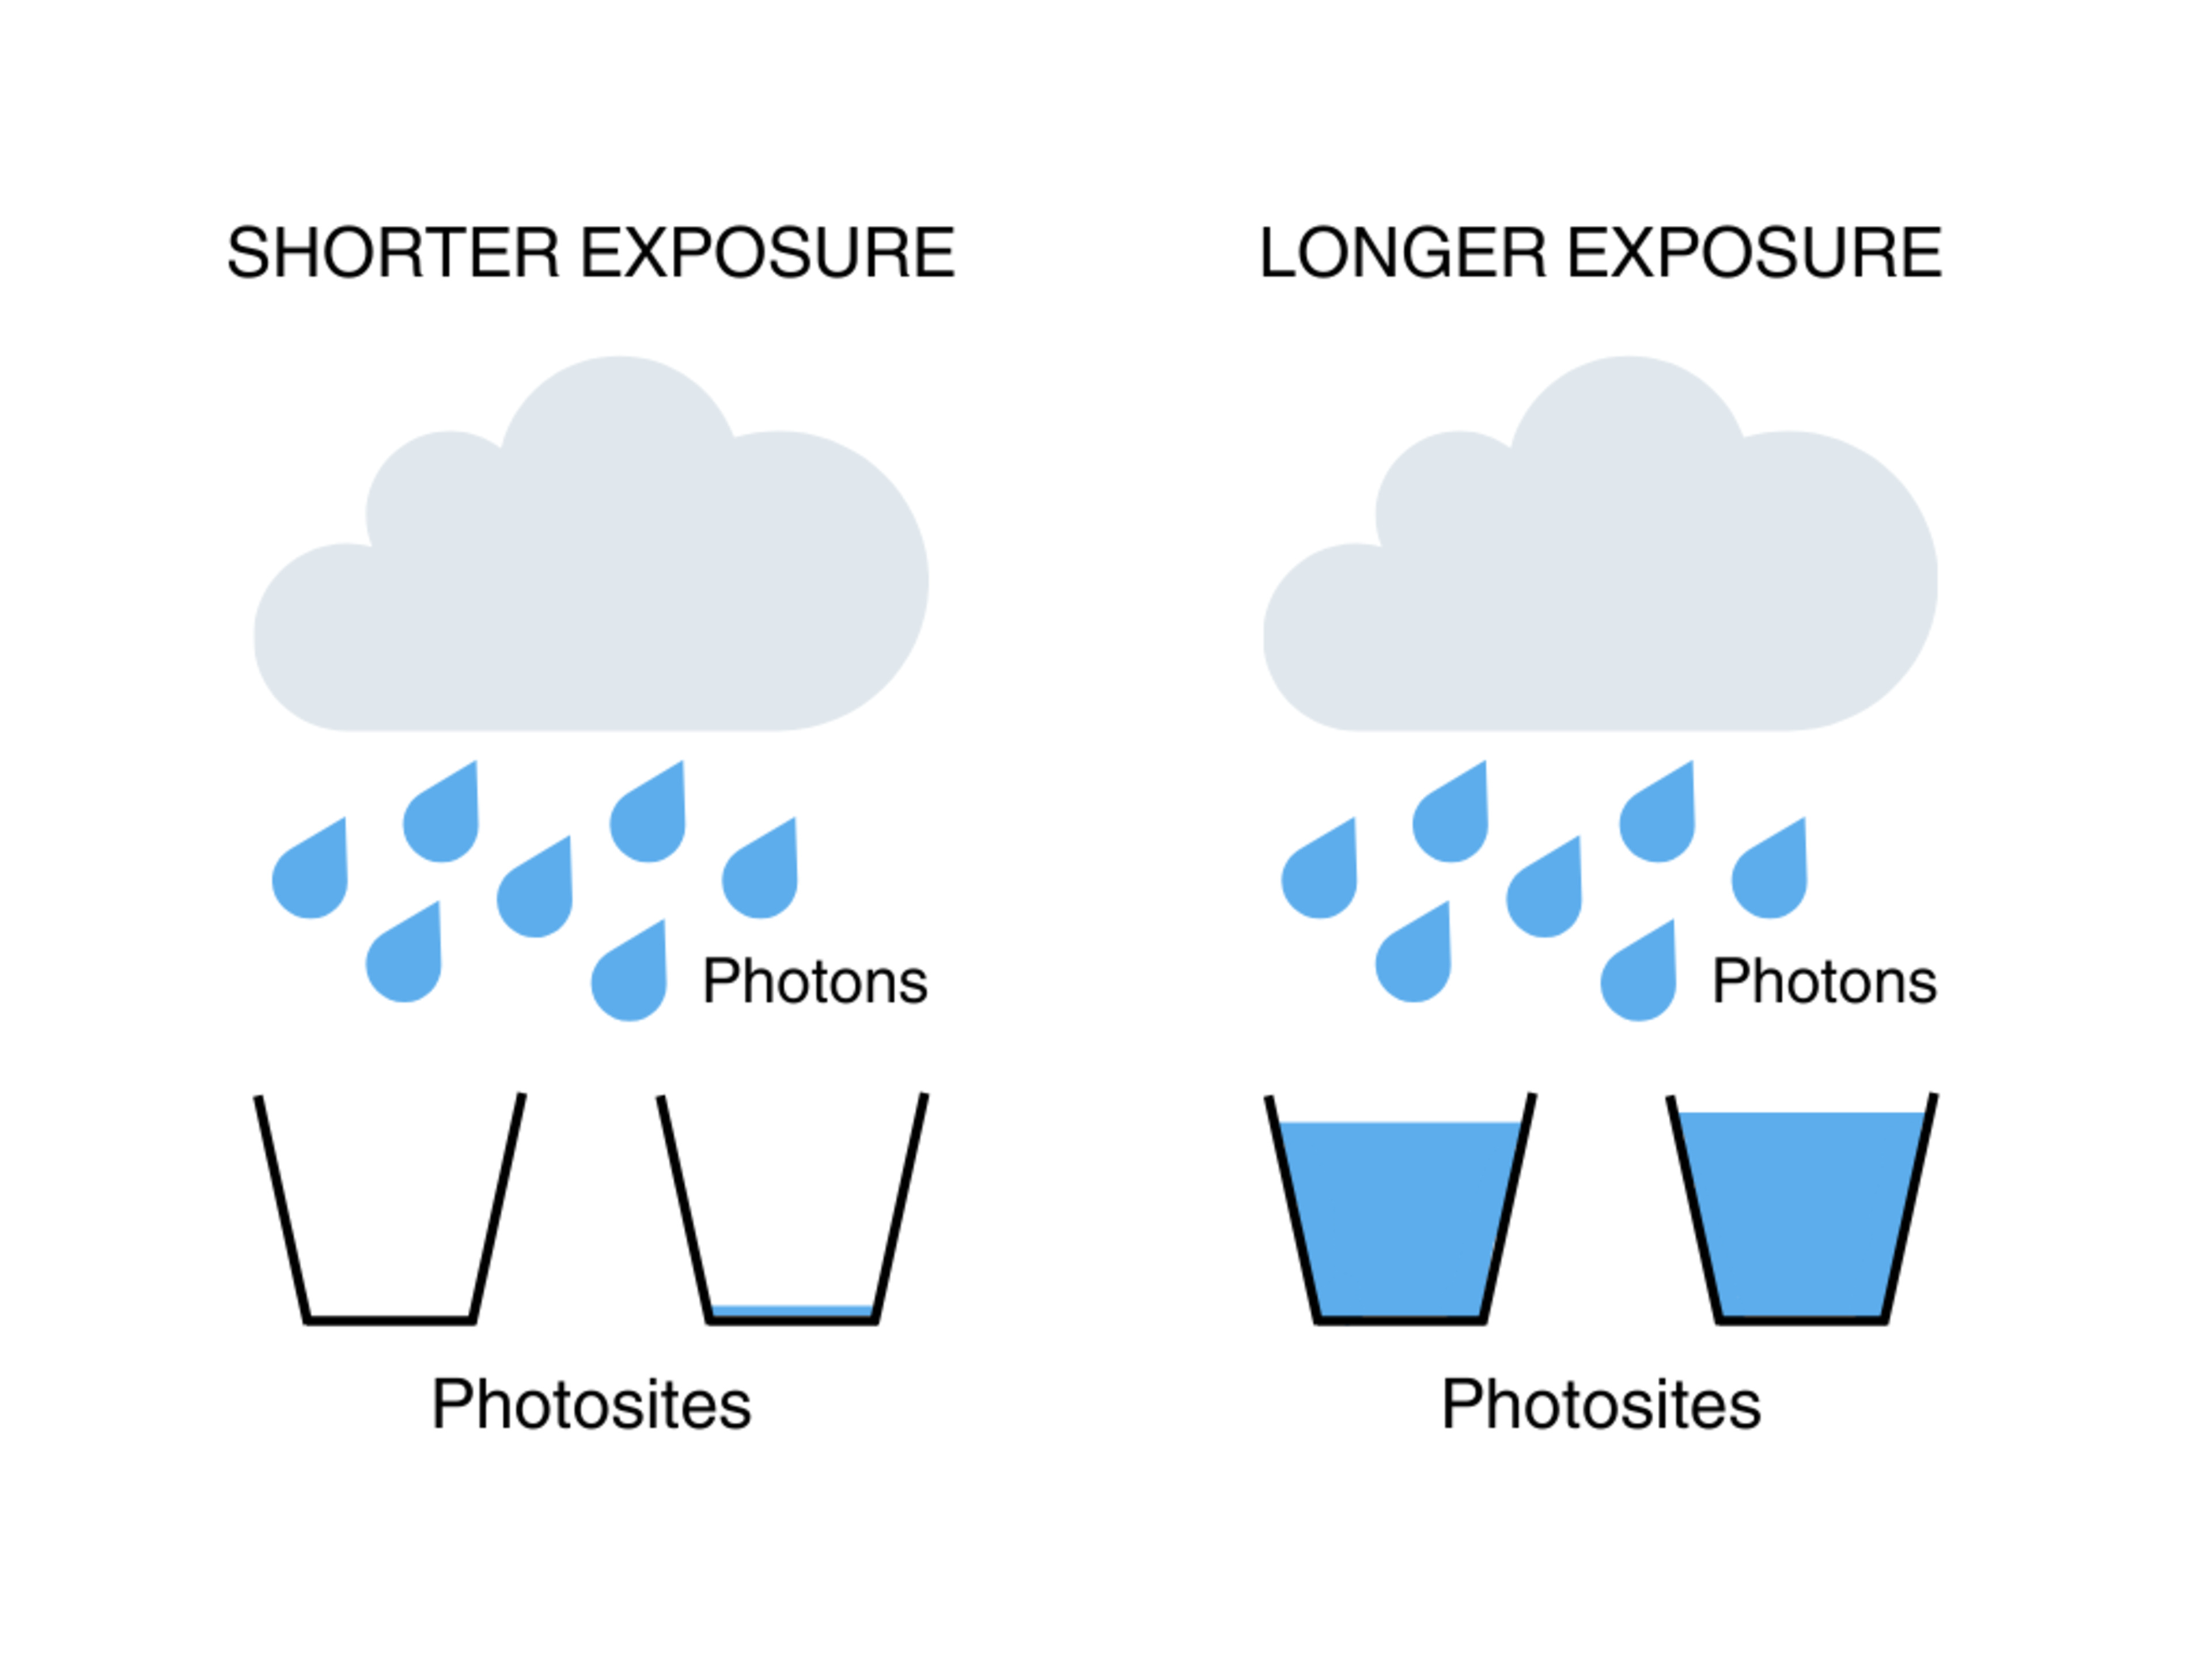
A common way to think about shot noise is to imagine the sensor photosites as buckets and photons as raindrops. If you expose the buckets to rain for a very brief period, the differences in the rain captured by each bucket will be much clearer—some buckets might be totally empty, while others might have a few drops, making the relative difference between them larger. But leave the buckets exposed for longer, capturing a greater number of total raindrops, and the average difference in raindrops becomes much less noticeable.
In other words, when there isn't enough light hitting the sensor, the random scattering of photons, like raindrops, is much more apparent. But leave the sensor exposed for longer, and more photons will hit the sensor, and the random variations in the exposure will be much less noticeable.
Our Tests
Our 'Photo RAW Noise' test consists of roughly two parts. One involves measuring the SNR of a series of photos taken by a camera across a range of shutter speeds. The resulting chart shows how much noise is present at a given exposure time. The second part of the test is to capture a scene that visually showcases each camera's noise performance in a way that's easy to compare across the many different cameras we test. We've stuck to shooting in RAW to get a better sense of the camera's raw sensor performance without additional JPEG processing or noise reduction.
Noise vs. Exposure Time
As explained above, noise is largely a result of natural random variation in how light particles hit a camera's sensor, as well as the electronics of the sensor. By testing cameras at different shutter speeds (AKA exposure times), we can see how different sensors register noise when more or less light is physically available. This gives you an idea of how a camera will perform in low light situations or when deliberately using a very fast shutter speed to freeze motion, for example.
We use an Imatest eSFR ISO test chart and a standardized lighting setup for this test. For interchangeable lens cameras, we use a Zeiss Milvus 50mm f/1.4 lens, with a mount adapter if needed, to take lens variation out of the equation as much as possible. For fixed-lens cameras, we set the focal length to 50mm (full-frame equivalent) or as close as possible.
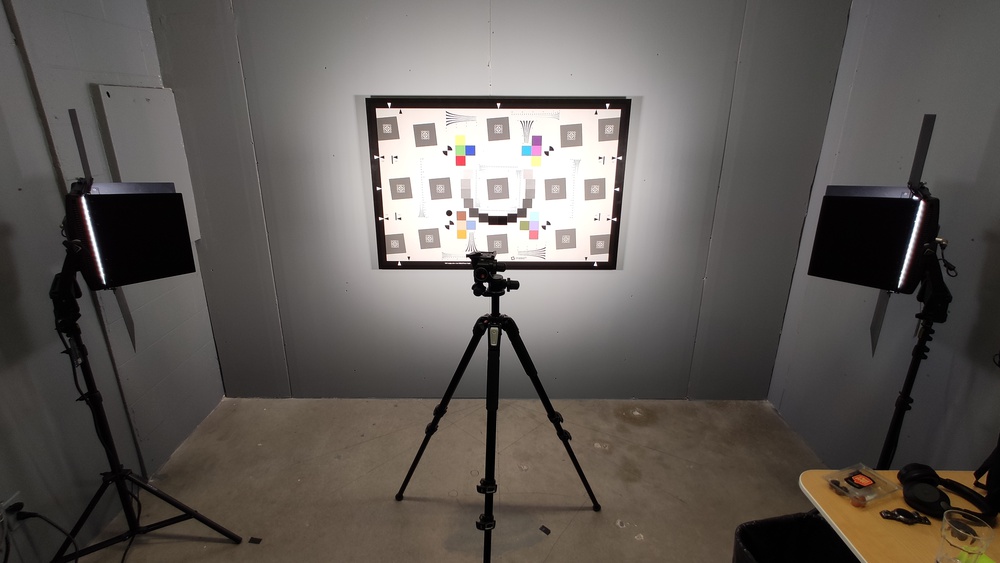
We fix the aperture at f/8 and then take a series of photos at a range of shutter speeds, with the ISO set to whichever value gets a properly exposed image of the test chart, starting at the camera's base ISO and increasing the shutter speed in increments until we can no longer get a properly exposed image.
We're not concerned about standardizing ISO in this test, because ISO values can vary across different manufacturers and cameras of different generations and sensor technologies. Because of that, and because in-camera metering can vary between different cameras. As a result, we determine the correct exposure by taking photos at a range of ISO values for each shutter speed setting and then, through RAWDigger, assessing at which point the highlights start to clip.
We then run the images through Imatest to generate measurements for SNR 18% At 1/8 Exposure Time, SNR 18% At 1/125 Exposure Time, SNR 18% At 1/1000 Exposure Time, and SNR 18% At 1/4000 Exposure Time.
The resulting graph visually represents these measurements:
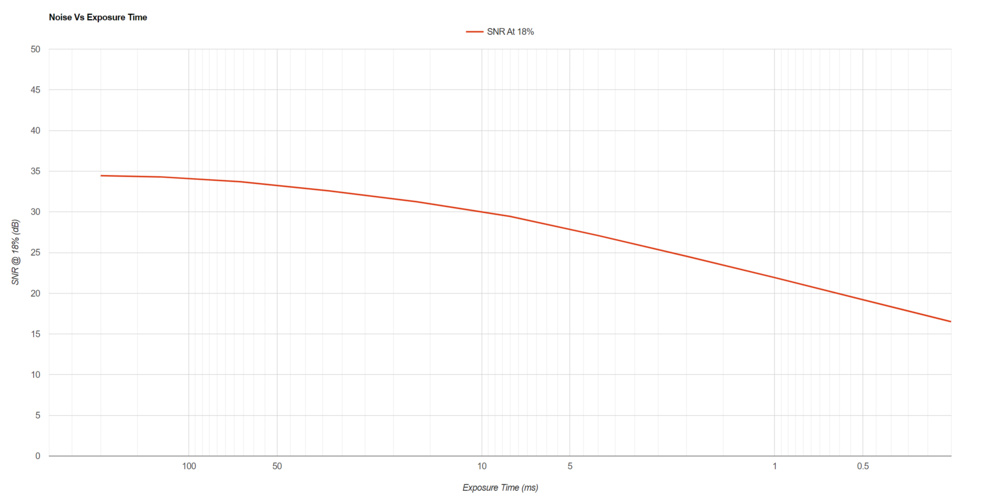 Noise vs. Exposure Time of the Canon EOS R6 Mark II
NOISE AND ISO
At this point, you might be wondering why we use exposure time as a measurement criterion as opposed to ISO, like most other reviewers. When people talk about noise, it's almost always in the context of ISO, where it's assumed that higher ISO settings actually "create" more visual noise. However, it's a common misconception that ISO in itself is a contributing factor to noise.
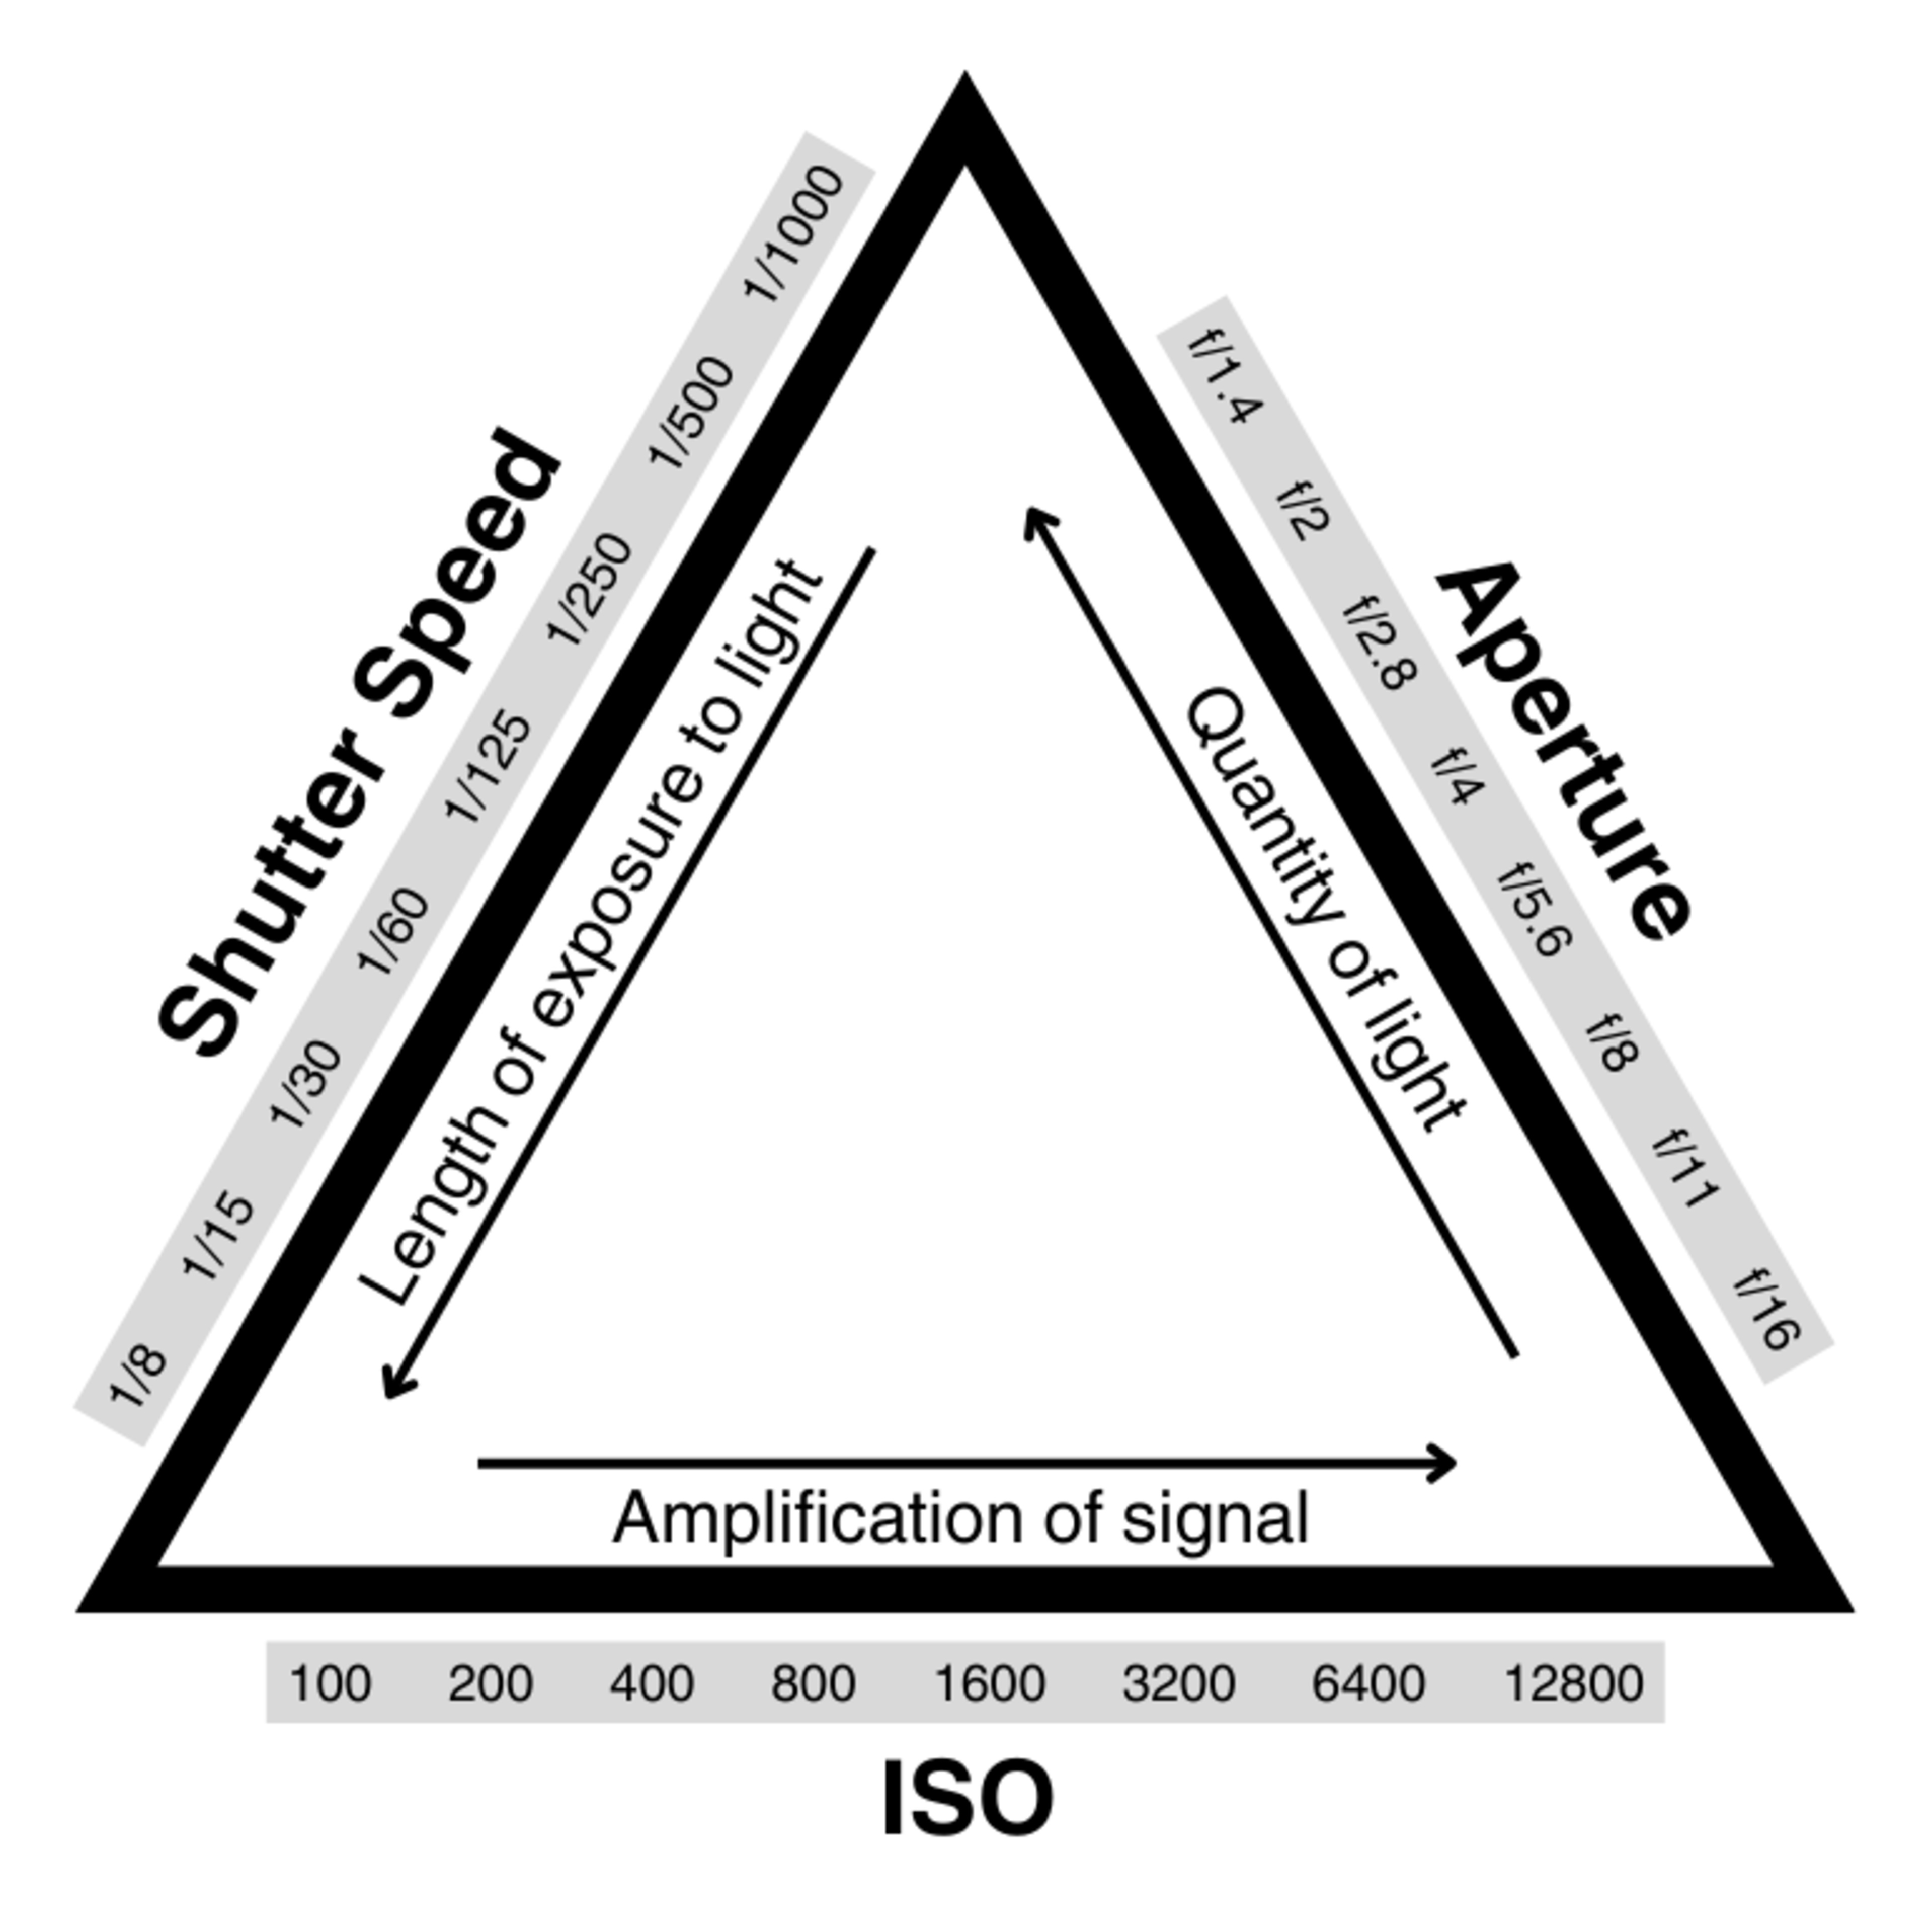
What's missing in these conversations is that ISO never operates in iso-lation (pun intended). ISO is one part of the exposure triangle, along with shutter speed and aperture, and the three should always be understood in relation to one another. Shutter speed (the amount of time the sensor is exposed to light) and aperture (how large the opening on the lens is) are the only aspects of the exposure triangle that affect the physical amount of light hitting the sensor, while ISO essentially amplifies whatever signal is there. In other words, ISO doesn't affect exposure.
Another way to think about this is to liken image noise to sound since light particles behave similarly to sound waves. Let's say you're recording a voice. If the person you're recording is close to the microphone and speaking loudly and clearly, the mic will pick up their voice with minimal static or noise in the background. But if the voice is too far or too quiet, you may need to turn up the gain on the microphone. Doing so, however, comes with the consequence of also boosting the existing static or background noise as a result of amplifying the signal.
What's happening here, and in your camera, is that by turning up the gain (or raising the ISO), you're boosting the signal but also amplifying whatever noise is there with it. This is why we commonly associate higher ISOs with more noise. But ISO doesn't add any new noise to your images—it simply makes the existing noise more apparent. Before gain or ISO enters the equation, the SNR has largely already been determined by the exposure—with a relatively weak signal, whether it's an overly quiet voice or too little light hitting a sensor, resulting in more apparent noise.
By using the amount of incoming light as our primary measurement criteria, we can also compare how different cameras handle noise according to the brightness of the scene, which gives us a better sense of how different sensors perform under the same conditions. That's because ISO is dependent on the camera itself, and how it's implemented can vary between cameras.
To illustrate, let's compare the Nikon D780 and the Sony α7C using our Noise vs Exposure Time graph.
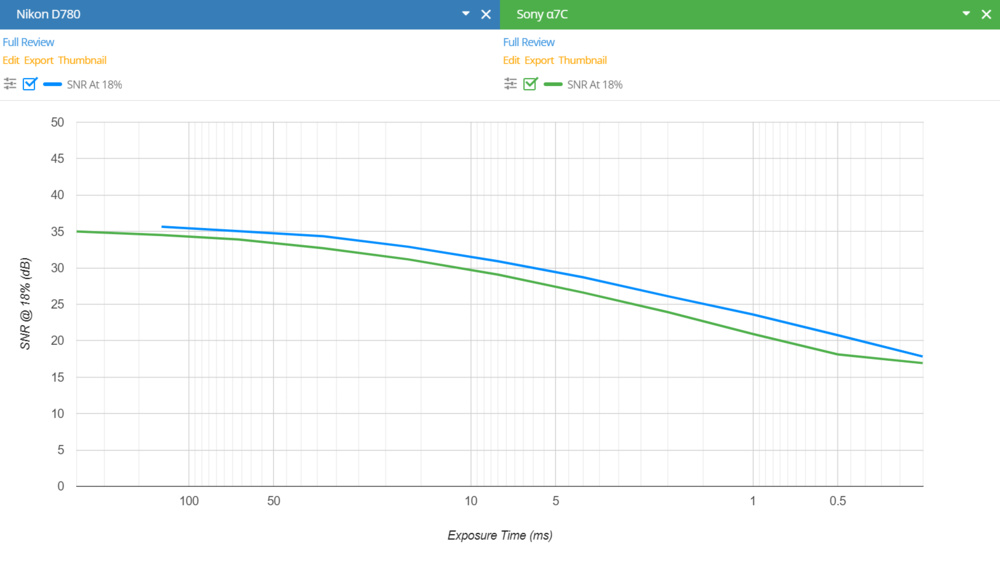 With the same amount of incoming light, the Sony requires an ISO value two times higher than the Nikon to get a properly exposed image. If we organized this data based on ISO instead of exposure time, however, the results would be as follows:
- Nikon D780 @ ISO 6400: 26.11 dB
- Sony α7C @ ISO 6400: 26.61 dB
At ISO 6400, the cameras appear to perform very similarly. But in basing our test on exposure time rather than ISO, we can see that with the same amount of light hitting the sensor—that is, with an exposure time of 1/250s and all else being equal—the Nikon only requires an ISO value of 3200 and has an SNR of 28.71 dB, to the Sony's ISO 6400 and 26.61 dB. The Nikon, therefore, outperforms the Sony when shooting in the same conditions.
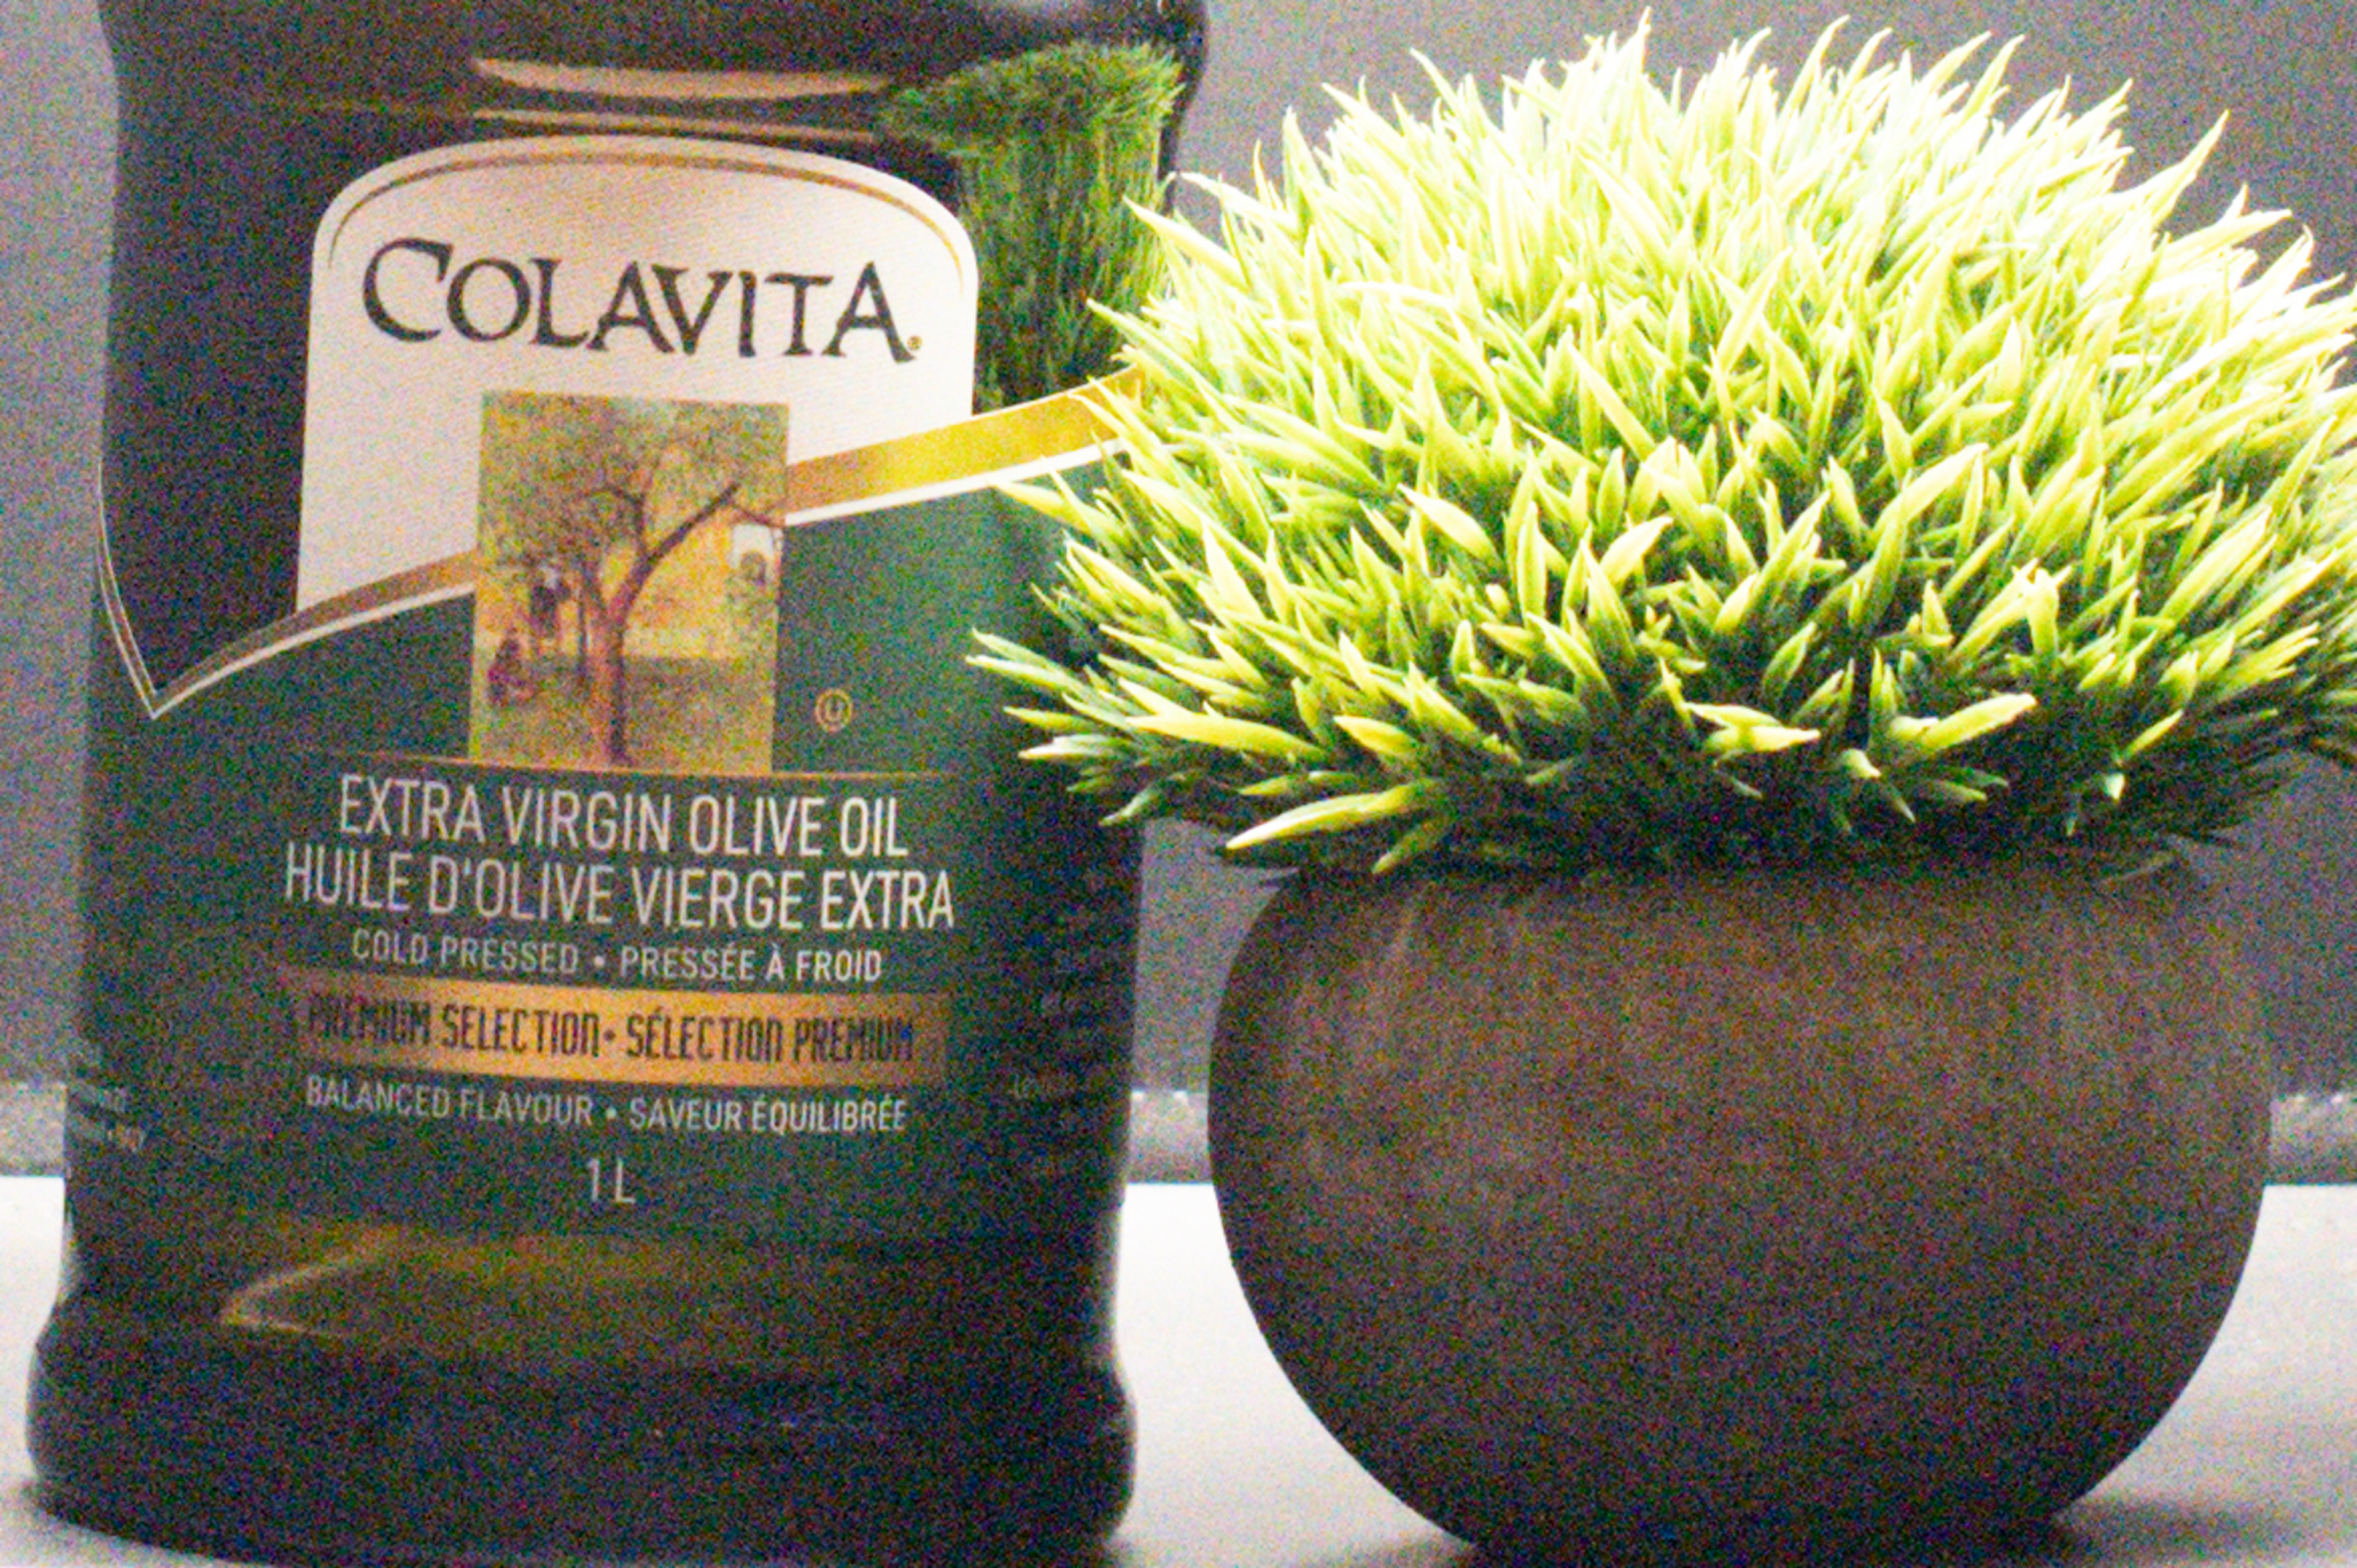
Test Scene
To visually represent these differences in performance, we capture an image of a test scene. For the scene, we set up a series of light boxes, each with an olive oil bottle and a small fake plant, next to a light diffused by a softbox.
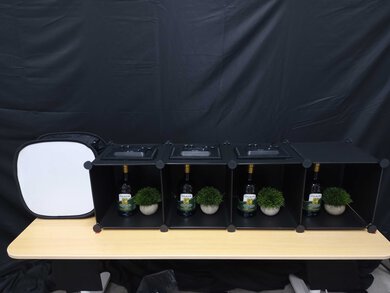
Using a standardized 1/125s shutter speed and f/8 aperture, we capture a photo of the test scene at the lowest possible ISO that gives us a properly exposed image. We then upload the image to Lightroom, boost the exposure to +3, and crop closely into the bottle and plant. We boost the exposure to ensure that there's sufficient noise in the image for a clear visual representation that can be compared across cameras:
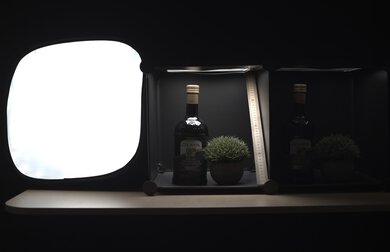
 Noise test scene taken with the Nikon D780
 Noise test scene taken with the Panasonic LUMIX FZ80
For example, the Nikon D780 scores very well in our 'Photo RAW Noise' test, with a measured SNR of 30.9 dB at a 1/125s exposure time. The Panasonic LUMIX FZ80, on the other hand, scores poorly, with an SNR of 17.1 dB at the same exposure time. That's nearly twice as much noise for the same amount of incoming light! Of course, this is an extreme example, using cameras with vastly different sensors in size and technology, but the difference in how they perform is very clear when looking at the test scenes above.
Additional Information
A Note On Scoring
Our scoring is meant to emphasize the differences between cameras, but in practice, you're unlikely to notice a big difference between a camera that scores a 9.5 and a camera that scores an 8.8. Our test gives you an idea of how different sensors handle noise under the same conditions, particularly when you can't increase the amount of incoming light. But in the field, there are different ways to get around noise. Introducing more light by increasing your exposure is usually the best way to do so, but noise reduction software is also getting more and more sophisticated, so even if noise is unavoidable, you can always try to reduce it after the fact. Ultimately, most modern camera sensors perform very well when it comes to controlling noise. So, while noise measurements can be important, the real-world differences are often marginal. When buying, it's better to focus on things like how good a camera feels in your hand, how intuitive its controls are, and whether you can use the lenses you want to use with it.
A Note On Sensor Size
Generally speaking, noise performance roughly correlates with sensor size. Cameras with larger sensors have a larger area to gather light, typically producing less noise. However, the sensor's resolution and the size of its pixels also play a role here. A full-frame sensor with a very high resolution could potentially have more per-pixel noise than an APS-C sensor with a lower resolution since the density of pixels is greater. That said, newer camera sensors with better technology may be better at overcoming noise than older sensors. In short, it's complicated. Not all sensors are created equal, and while a camera with a full-frame sensor will usually perform better in low light than a crop sensor camera, many factors play into this.
That, however, is beyond the scope of this article. If you want to learn more, we direct you toward Richard Butler's excellent rundown of this topic at DPReview.
How To Get The Best Results
Knowing where noise comes from can make you a better photographer. Sometimes, you may want to freeze motion, for example, and have to use a faster shutter speed, resulting in less light reaching the sensor. You may have to raise your ISO to get proper exposure, which will amplify the low SNR and result in a noisy image. However, what appears to be a product of ISO is really due to a lack of light. Remember: less light = more visible noise. But crank open the aperture or slow down the shutter speed, and the camera is taking in more light, resulting in less noise overall.
When you buy into the idea that high ISO settings "create" more noise, it becomes easy to fall into the trap of trying to keep your ISO as low as possible at the expense of a properly exposed image. More often than not, however, it's better to use a higher ISO setting if it helps get a properly exposed photo than it is to keep your ISO low and underexpose your image. By understanding that noise is a function of exposure and isn't caused by ISO, we no longer need to fear higher ISO settings. ISO, after all, is a tool like any other in the photographer's tool belt, and knowing how and when to use it correctly is key.
Conclusion
Unwanted noise can detract from the perfect photo. But camera sensors are increasingly capable of minimizing noise, and noise reduction software is getting more impressive. Our 'Photo RAW Noise' test shows how different cameras handle noise in situations where you may have to shoot at higher ISOs with less light hitting your sensor. Regardless of how your camera performs, understanding where noise comes from can help you reduce it in your images. All of that said, there's a lot of, well, noise about noise. It's easy to get caught up in worrying about how noisy your photos are. But in the end, it's better to get the shot, noise and all, than to miss it for fear of capturing a noisy image.
Further Reading
If you'd like to learn more about image noise, here are some good places to start: