Products
Tested using Methodology v0.11
Updated Apr 10, 2026 07:58 PM
Tested using Methodology v0.11
Updated May 01, 2026 03:04 PM


Our Verdict
Nike Alphafly 3
On Cloudboom Strike
The Nike Alphafly 3 and the On Cloudboom Strike are two high-performance racing shoes designed for serious runners, both tailored for marathon distances, but they excel in different ways. The Nike shoe has marginally better energy return and lateral stability. Its design prioritizes efficiency, making it a top choice for runners seeking an aggressive race-focused shoe. In contrast, the On focuses on a more cushioned ride, particularly in the forefoot area. It provides a softer landing experience, benefiting runners looking to reduce impact stress during races. While it may not offer the same explosive toe-off as the Nike, it delivers a well-balanced ride that's particularly effective for maintaining comfort and performance over the full marathon distance.
Variants
- Alphafly 3 (Black/Olive Aura/Metallic Silver - (Men - US 9))
- Alphafly 3 (Bright Crimson/Lime Blast/Mint Foam/Cave Purple - (Men - US 9))
- Cloudboom Strike (Limelight/Wolf - (Men - US 9))
- Cloudboom Strike (Limelight/Wolf - (Women - US 7))
Main Differences for
Marathon Racing
Threshold
Marathon Racing
Full Comparison
Weight
Right Shoe Weight Photo


Left Shoe Weight Photo


Weight
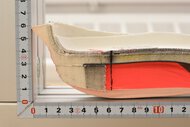
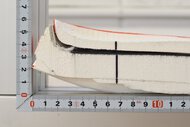
Stack Heights
Stack Height Photo


Heel Stack Height
Forefoot Stack Height
Heel-To-Toe Drop
Advertised Heel-To-Toe Drop
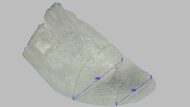
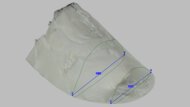
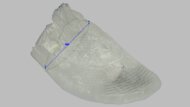
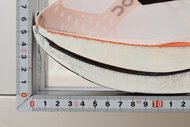
External Shape
3D Model Full Shoe


Outsole Heel Width
Outsole Arch Width
Outsole Forefoot Width
Heel Width-To-Stack Ratio
Forefoot Width-To-Stack Ratio
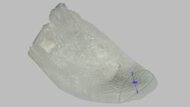
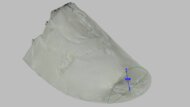
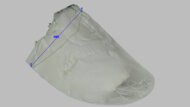
Internal Shape
3D Model Internal


Internal Length
Internal Heel Width
Internal Forefoot Width
Wide Sizing Available
Forefoot Fit: Width
Forefoot Width Photo
Ball-Of-Foot TTS Deviation
Toe TTS Deviation
Forefoot Fit: Height
Forefoot Height Photo
Toe TTS Deviation
Arch Fit: Width
Arch Fit Photo
Arch Width TTS Deviation
Length Fit
Toe Clearance Photo

Heel Rocker Geometry
Heel Rocker Photo
Heel Spring
Heel Apex Position
Heel Rocker Angle
Forefoot Rocker Geometry
Forefoot Rocker Photo
Toe Spring
Toe Apex Position
Forefoot Rocker Angle
Other Features
Other Features Photo


Tongue Gusset Type
Plate
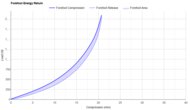
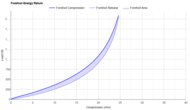
Heel Compression Energy Return
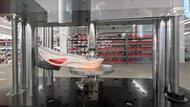
Heel Compression Video
Heel Energy Return


Heel Energy Return
Forefoot Compression Energy Return
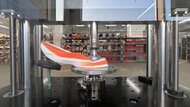
Forefoot Compression Video
Forefoot Energy Return
Forefoot Energy Return
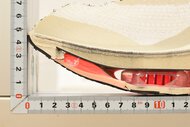
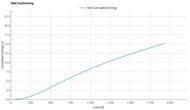
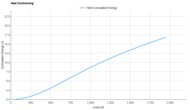
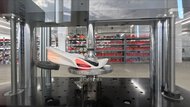
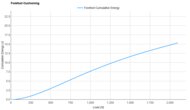
Heel Cushioning
Heel Cushioning Picture
Heel Cushioning
Energy Absorbed At 550N
Energy Absorbed At 1100N
Energy Absorbed At 1900N
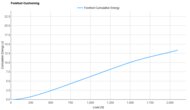
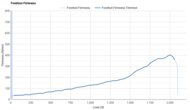
Forefoot Cushioning
Forefoot Cushioning Picture
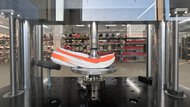
Forefoot Cushioning
Energy Absorbed At 800N
Energy Absorbed At 1300N
Energy Absorbed At 2050N
Heel Firmness
Heel Firmness
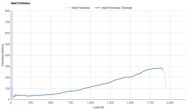
Firmness At 550N
Firmness At 1100N
Firmness At 1900N
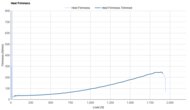
Forefoot Firmness
Forefoot Firmness
Firmness At 800N
Firmness At 1300N
Firmness At 2050N
Forefoot Long Run Cushioning
Forefoot Long Run Cushioning
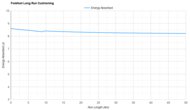
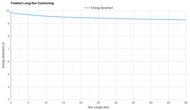
Energy Absorbed At 10km
Energy Absorbed At 20km
Energy Absorbed At 30km
Energy Absorbed At 40km
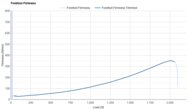
Rocker Stiffness
Forefoot Rocker Stiffness Video
Forefoot Rocker Stiffness Graph

Force To Flatten The Rocker
Forefoot Bending Energy Return
Forefoot Bending Video
Forefoot Bending Energy Return
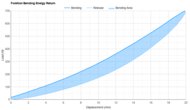
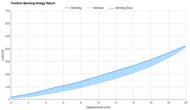
Forefoot Bending Energy Return
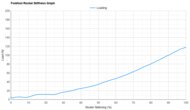
Forefoot Bending Stiffness
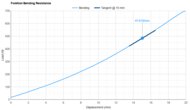
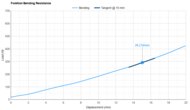
Forefoot Bending Resistance Picture
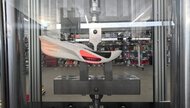
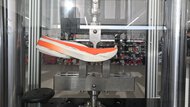
Forefoot Bending Resistance
Nike Alphafly 3
On Cloudboom Strike
Comments
Nike Alphafly 3 vs On Cloudboom Strike: Main Discussion
What do you think of these products? Let us know below.
Looking for a personalized buying advice from the RTINGS.com experts? Members have direct access to buying advice on our member forum.