- 20.0%SRAV @ 1600 CPI
- 25.0%SRAV @ 800 CPI
- 15.0%SRAV @ 400 CPI
- 60.0%SRAV @ Fixed CPI
- 10.0%Precision Error Between Speeds
- 10.0%Precision Error Between CPI
- 10.0%Worst Tracking Error
- 5.0%Minimum CPI
- 2.5%Maximum CPI
- 2.5%CPI Adjustment Steps
CPI represents the number of pixels your cursor moves on the screen when you move your mouse one inch on your mousepad or desk.
Many mouse manufacturers and some online sources will use the term DPI to refer to the same thing. However, DPI stands for 'dots per inch' and is more closely related to display resolutions, while CPI stands for 'counts per inch' and refers directly to the sensitivity of a mouse.
The CPI test aims to measure how closely a mouse's actual movement matches its set CPI value.
Test results
When It Matters
A mouse's CPI setting determines how 'sensitive' your cursor movements are on your screen. For example, if you're using a mouse set to 400 CPI, when you move your mouse one inch on your mousepad, your cursor will move 400 pixels on your screen.
Using a higher CPI setting will result in cursor movements that feel more sensitive, as it takes smaller physical movements to move your cursor further on the screen. Most people find using a CPI setting between 800 CPI and 3200 CPI to be most comfortable, and finding the best CPI settings comes down to your personal preference.
When talking about CPI, there's added confusion because of how mice are marketed. Manufacturers have advertised increasingly wider CPI ranges over the last several years, and many high-end gaming mice now have sensors with maximum CPI settings of 30000 CPI or more. However, you aren't expected to use these higher CPI settings, and they don't directly relate to how accurate a sensor is. Many sensor firmware implementations introduce smoothing at very high CPI levels to attempt to reduce jitter.
It's a simplified analogy, but it can be helpful to think of a mouse sensor as a bit like a camera that takes pictures of the surface you move over. Your mouse then uses this information and translates your movements into the cursor movements you see on the screen. Higher CPI ranges only signify that your sensor has a higher resolution, so it takes a more detailed image of the mousepad or desk as you move your mouse over it. While this plays a large part in how accurately your movements can be translated into cursor movements, a higher CPI range alone does not necessarily mean a sensor is more accurate than one with a narrower CPI range.
Our Tests
When testing a mouse's CPI, we use an actuator system with a wooden clamping frame to hold the test mouse in place.
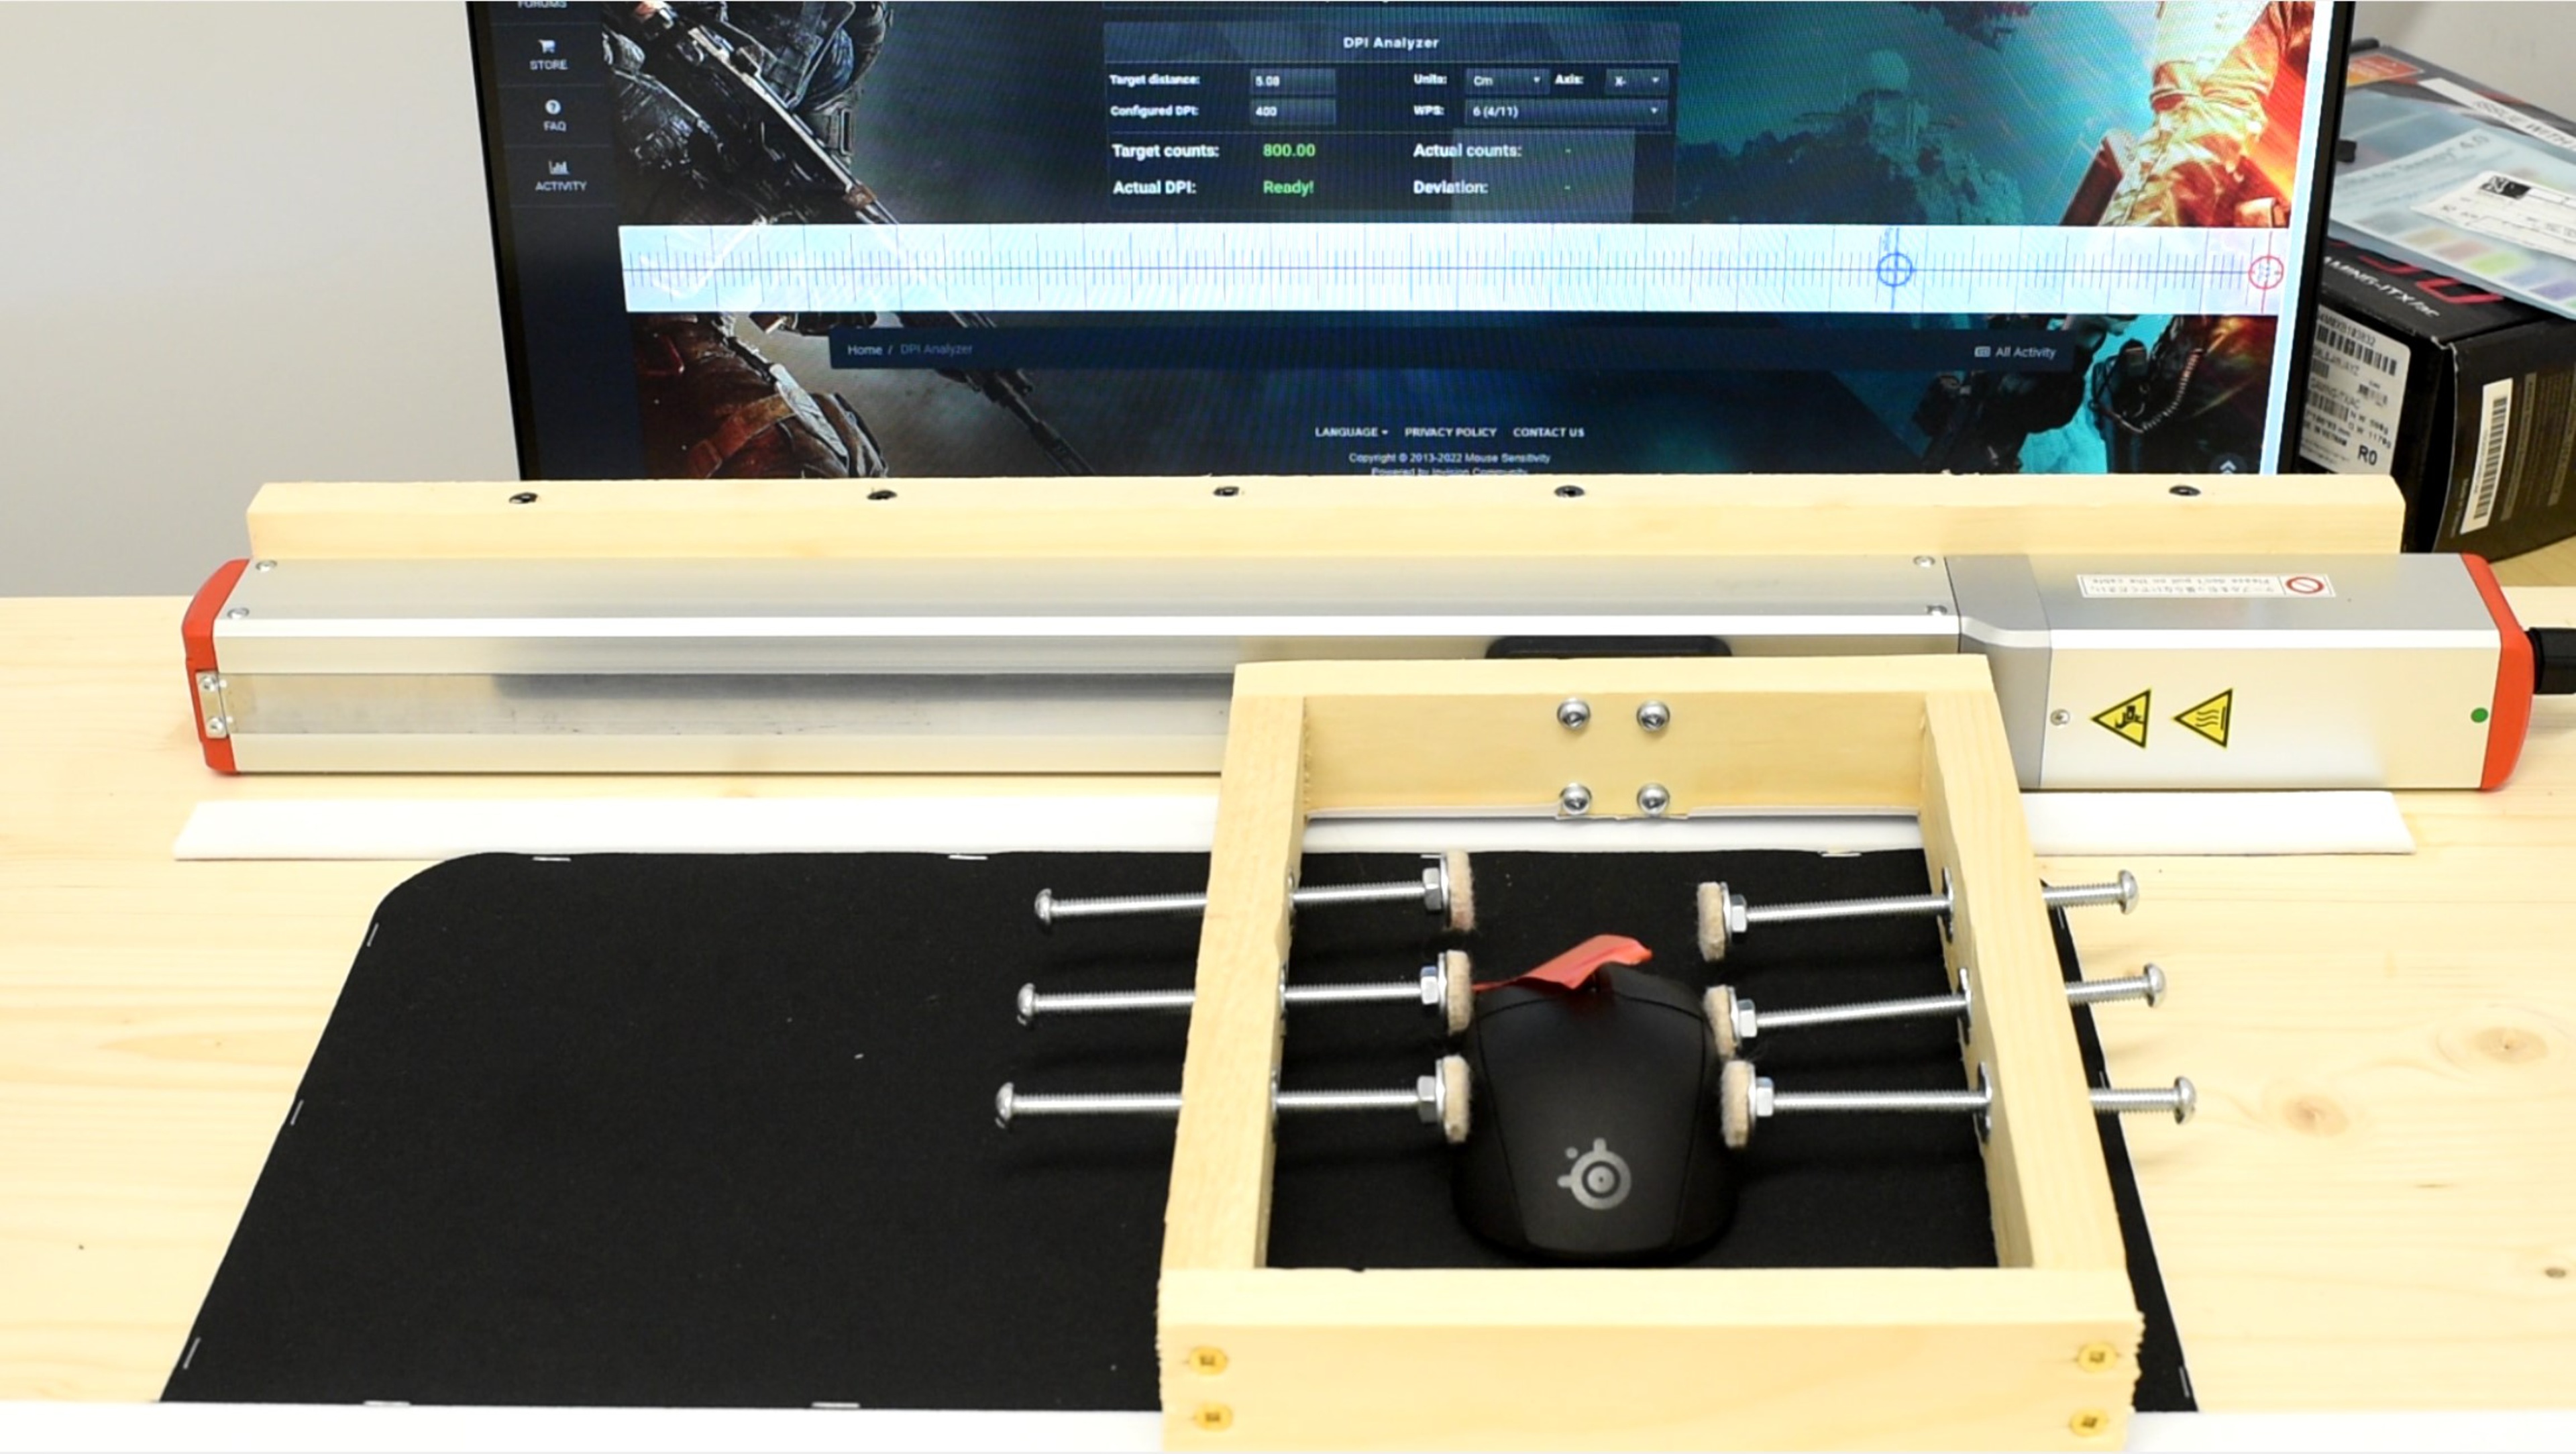
With this setup in place, we use a web-based CPI analyzer tool using the settings below:

For a mouse with adjustable CPI values, we test it at three CPI settings and three different speeds on the actuator system.
If the mouse we're testing has a fixed sensor CPI value, the testing procedure is the same, but it's only tested using the mouse's fixed CPI value at three different speeds on the actuator system.
Also, note that this process is slightly different for trackball mice. For trackballs, we measure the diameter of the trackball and use a formula to determine the arc length. We then replace the Target Distance setting with the calculated arc length and run our tests without the use of the actuator setup. You can see a video example of what this test looks like with a trackball.
For a mouse with adjustable CPI values, the standardized CPI settings used are:
- 400 CPI
- 800 CPI
- 1600 CPI
The three different actuator test speeds used for all tested mice are:
- 25mm/s
- 100mm/s
- 200mm/s
The test is run three times for each tested CPI value at each test speed.
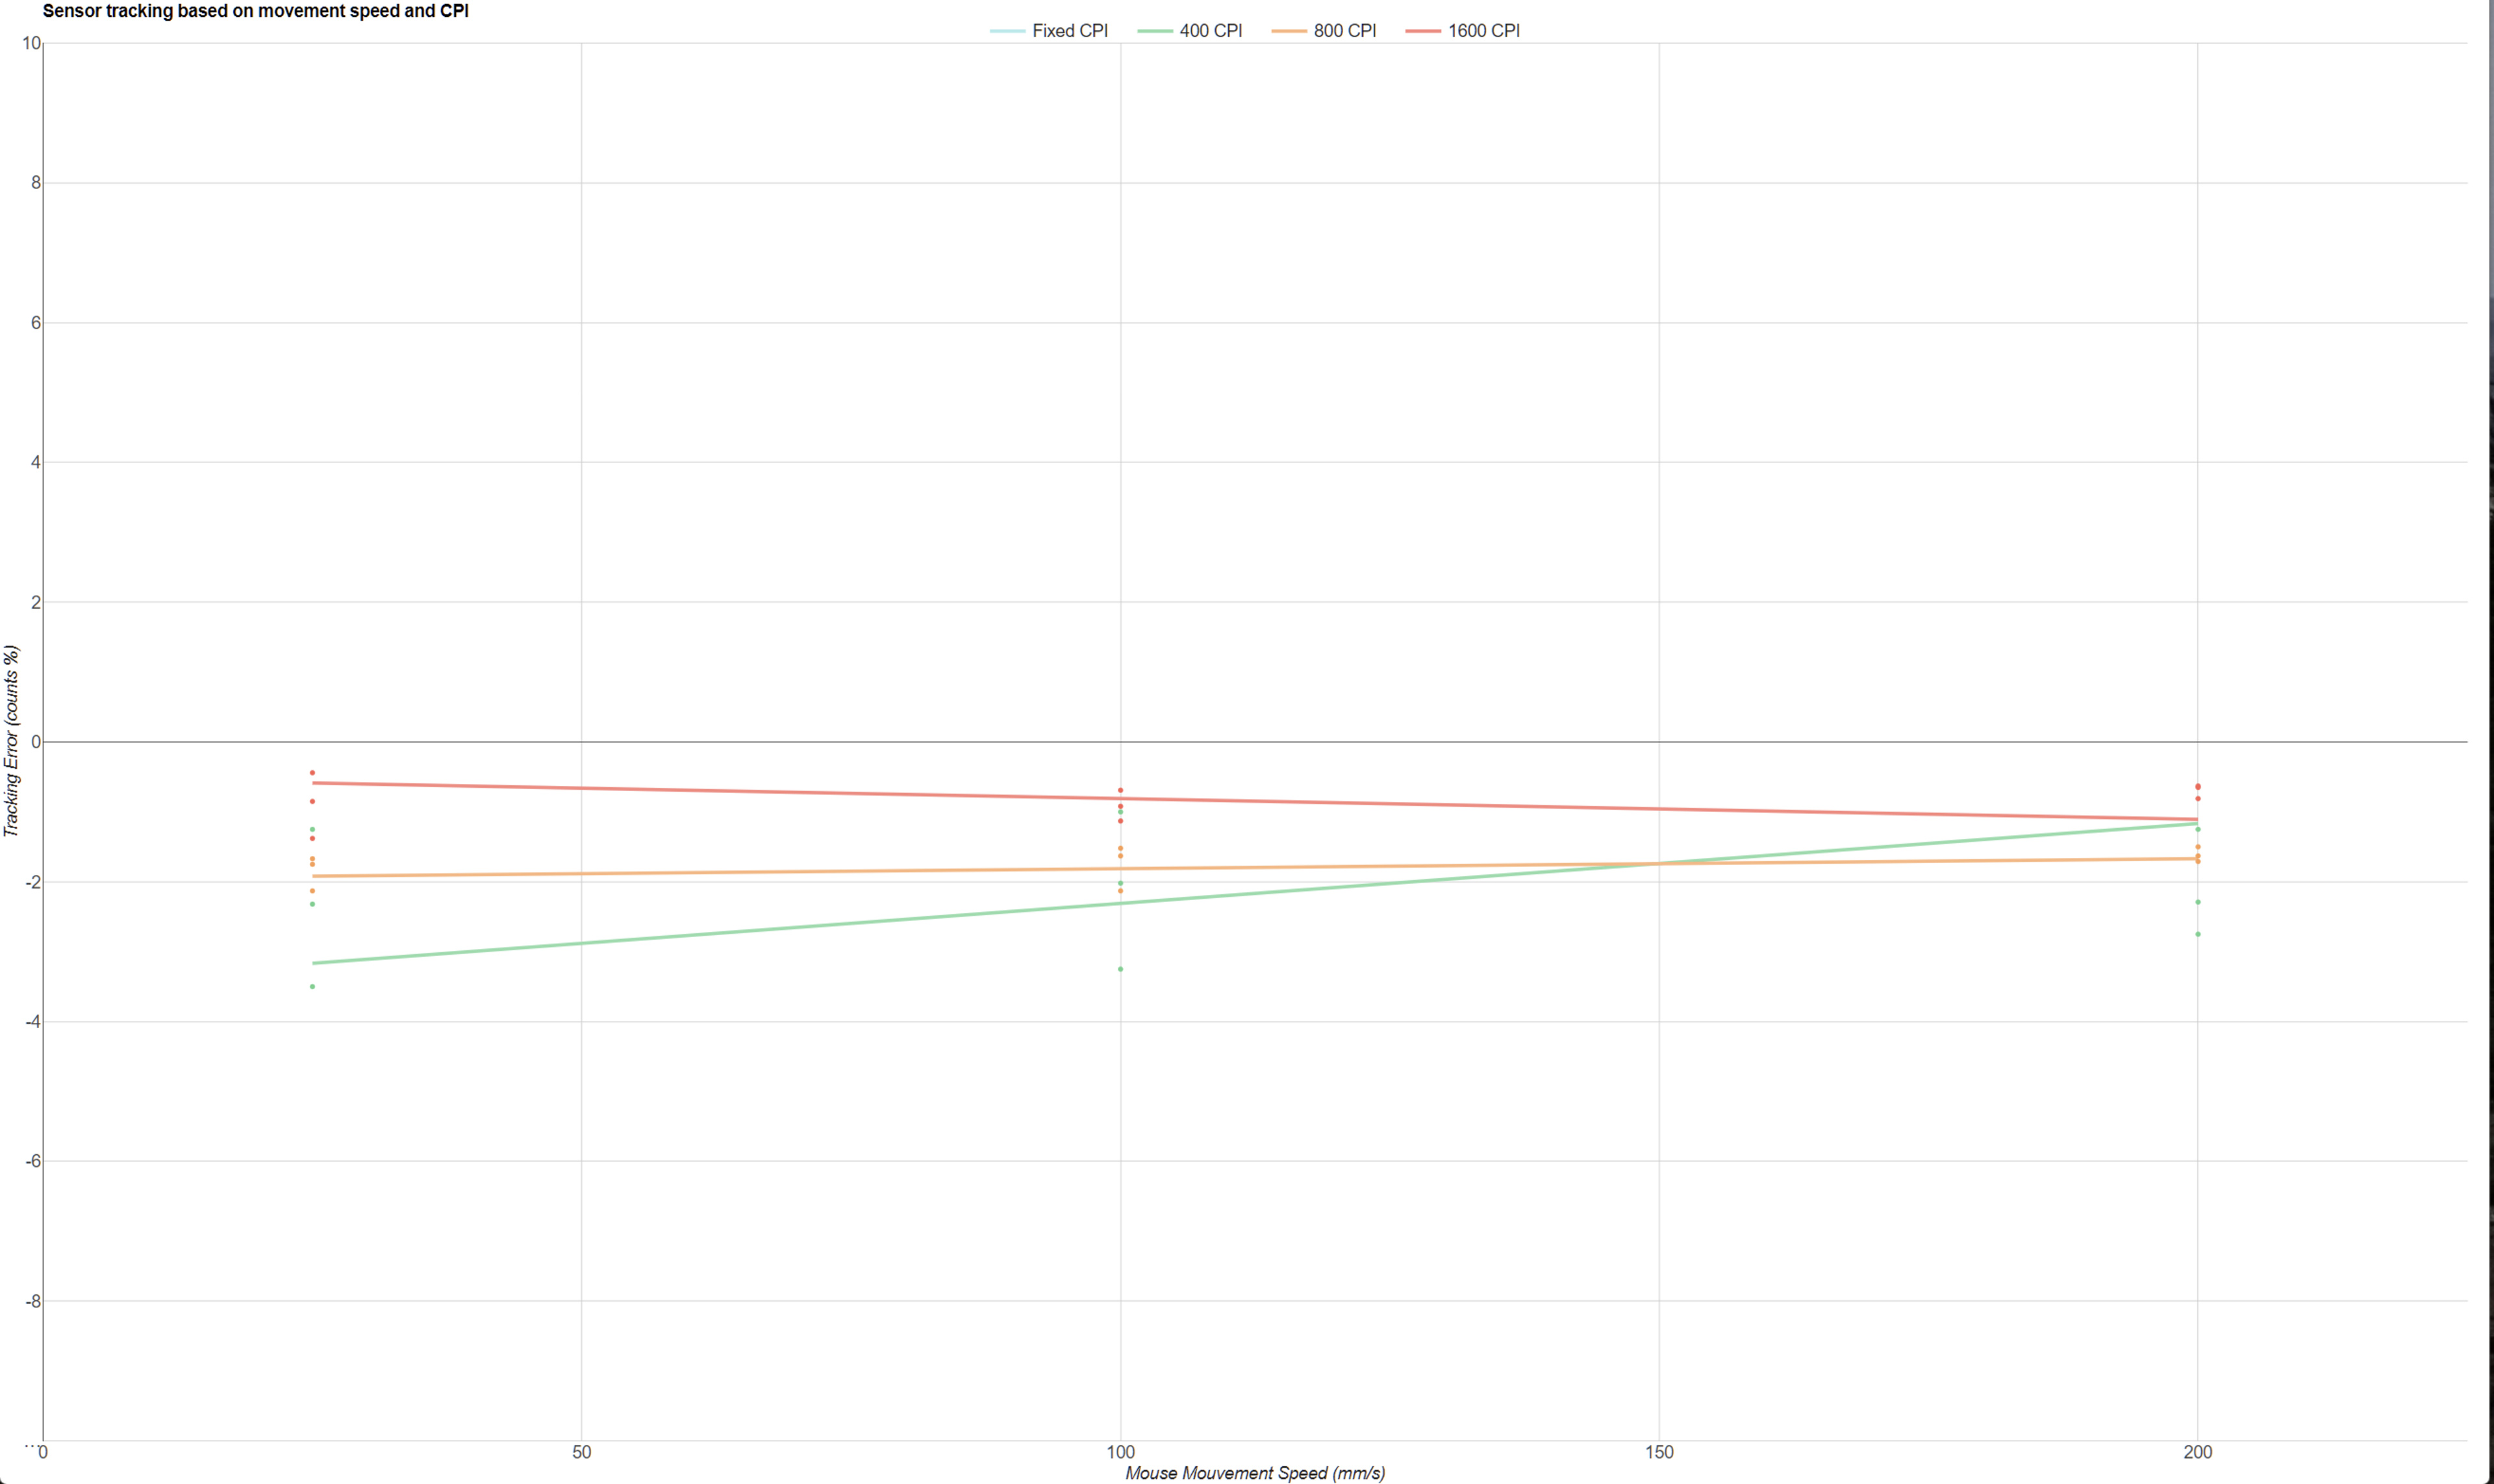
The deviation result is recorded for each run, and we represent the results with a graph. For comparison, you can browse the graphs generated for each of our tested mice using our comparison tool.
The vertical axis of this graph is the CPI deviation error, while the horizontal axis is the actuator speed. The points represent individual data, and you can hover your cursor over them to see the exact results.
You can see an example of this graph in the photo below.
The speed-related accuracy variation (SRAV) is calculated and represented for each tested CPI setting on a separate set of graphs. The image below shows an example of this set of graphs.
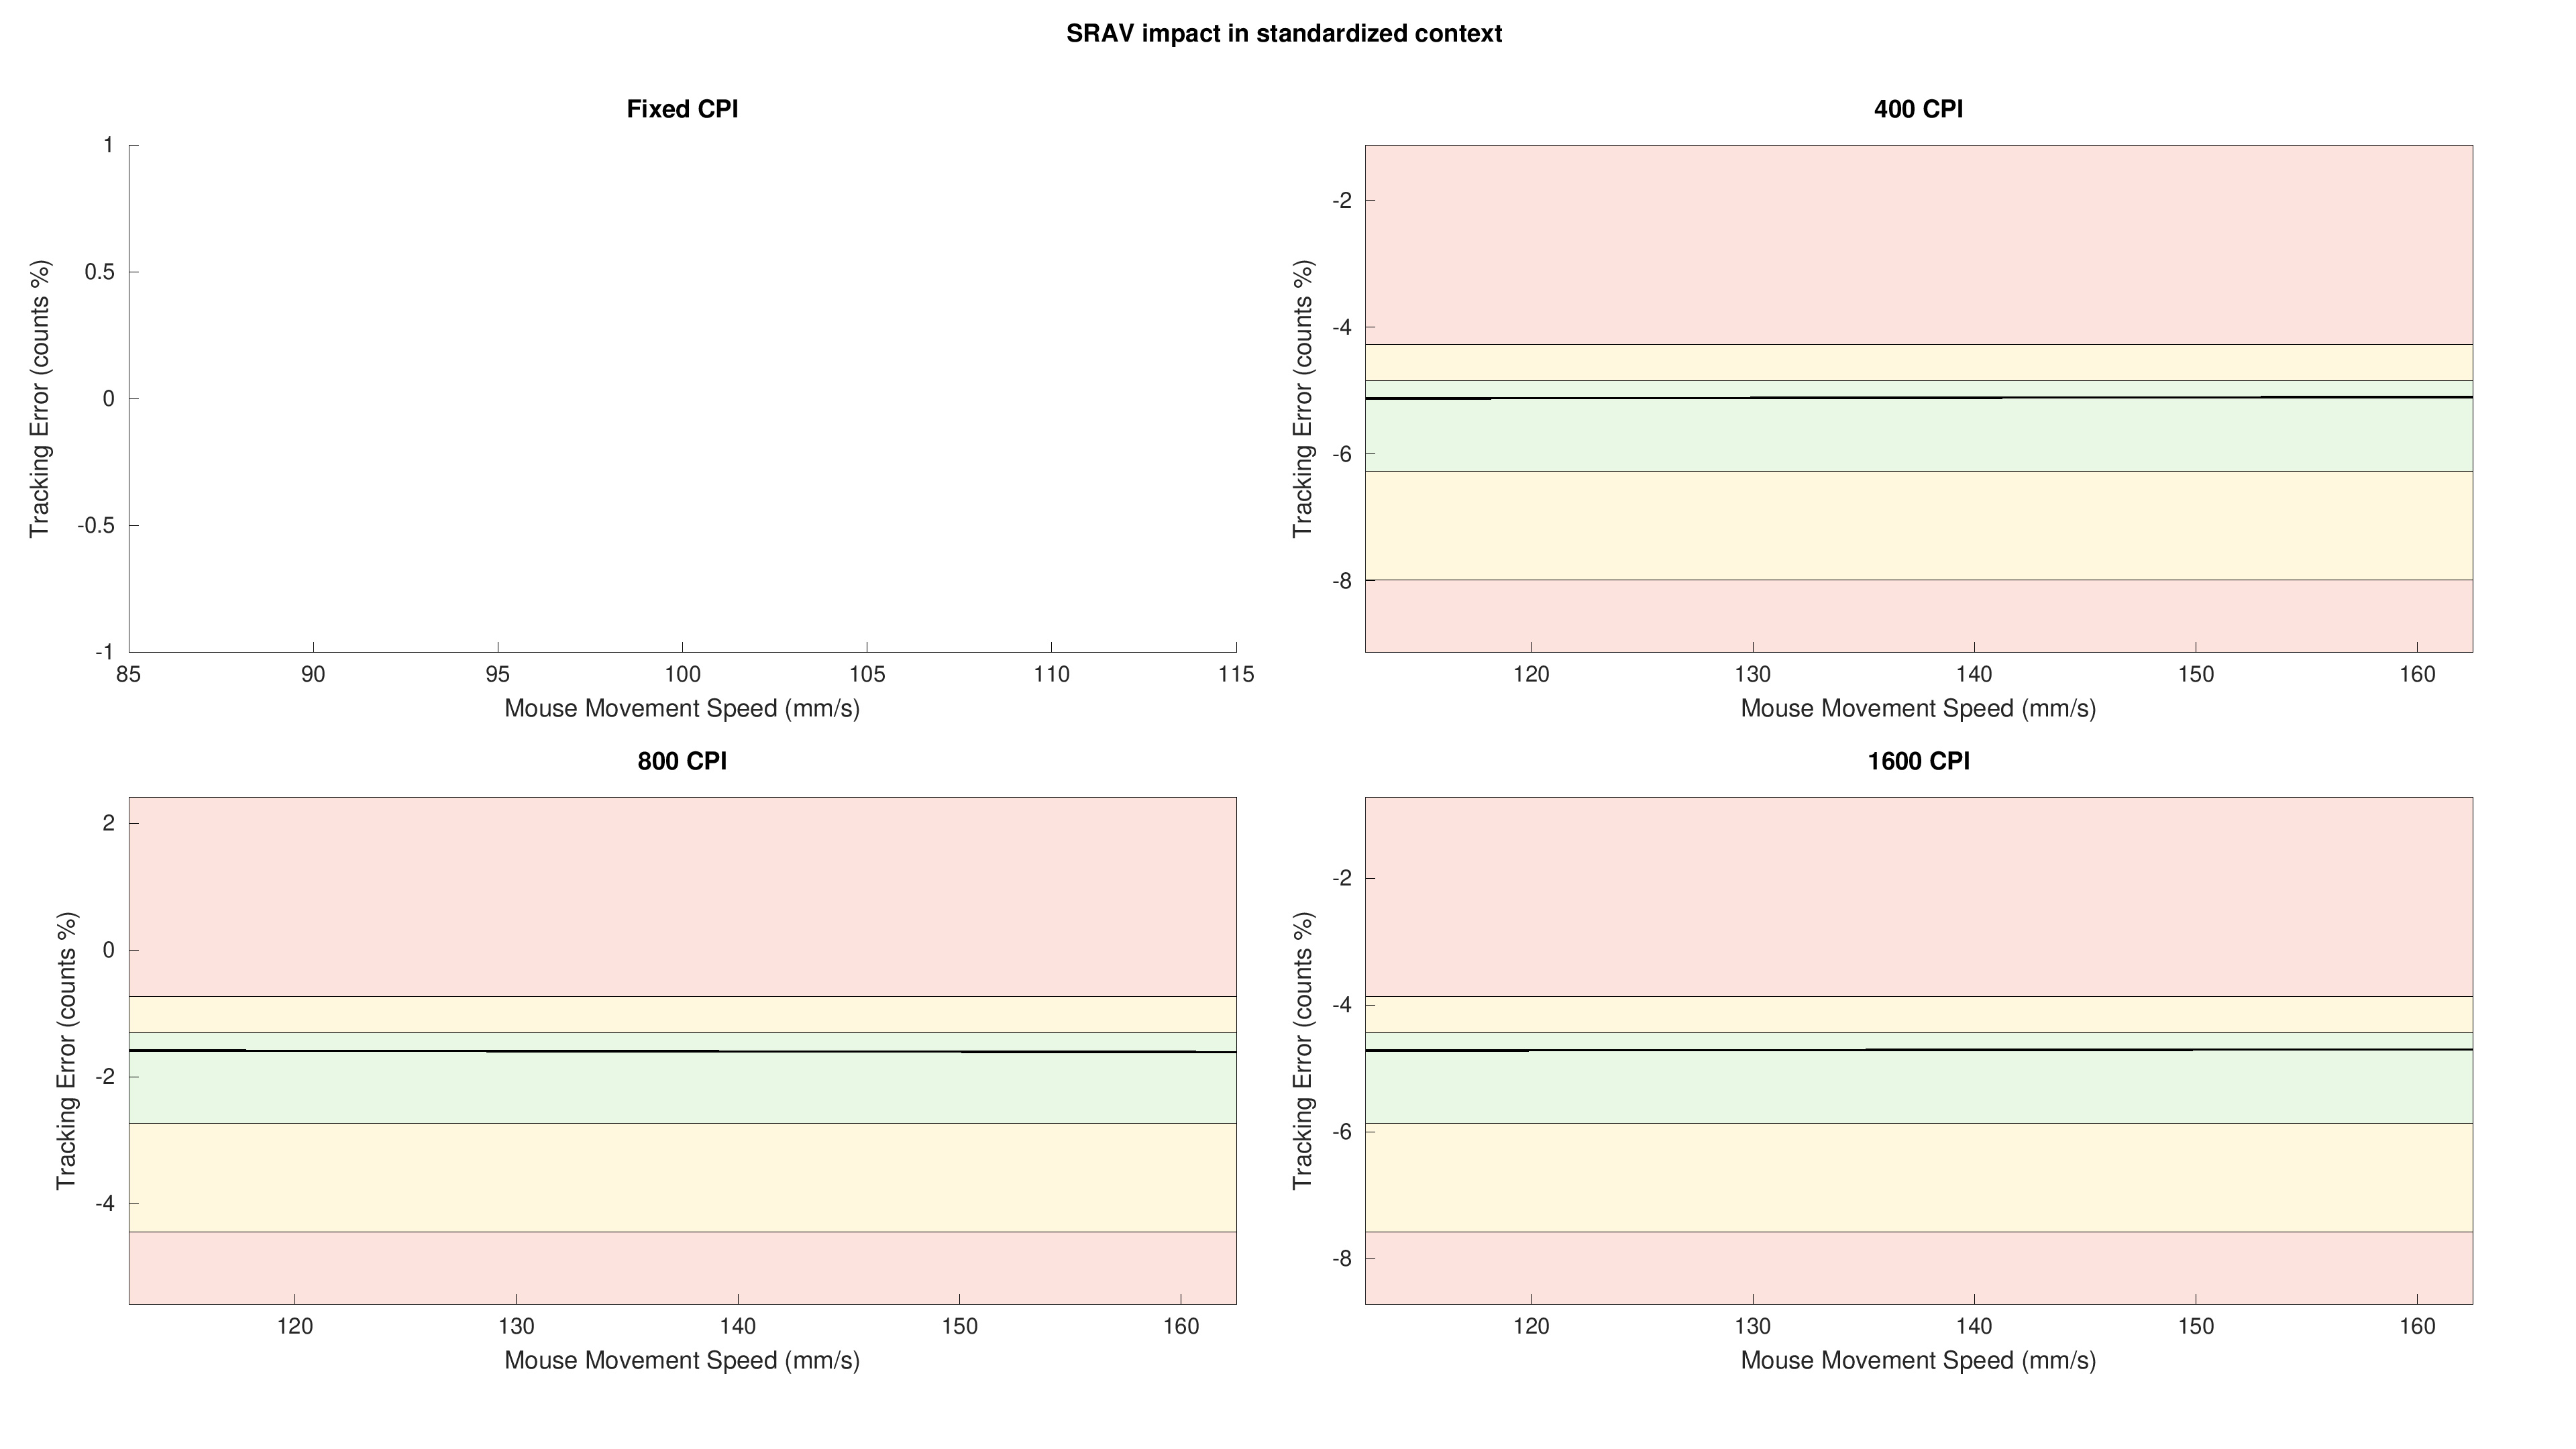
Speed-Related Accuracy Variation (SRAV)
The Speed-Related Accuracy Variation (SRAV) is the difference between the average deviation error at the fastest speed (200mm/s) and the average deviation error at the lowest speed (25mm/s) for each CPI setting tested.
Precision Error Between Speeds
The Precision Error Between Speeds is calculated by taking the standard deviations of the CPI errors for all three test speeds at a single CPI setting. This calculation is then performed for all tested CPI settings, and the values are averaged to provide our result. This result indicates how speed impacts your mouse's sensor to maintain a consistent CPI setting.
Precision Error Between CPI
The Precision Error Between CPI is calculated by taking the standard deviation of all tested CPI settings at a single test speed. This calculation is then performed for all speed settings, and the values are averaged to indicate how significantly the mouse deviates between different CPI settings on average.
Worst Tracking Error
The Worst Tracking Error is the furthest single deviation point from the 0% line.
Minimum CPI
We determine the Minimum CPI by checking manufacturer specifications, including user manuals, press kits, and product pages. We can also confirm this value using the mouse's customization software, if applicable.
Maximum CPI
We determine the Maximum CPI by checking manufacturer specifications, including user manuals, press kits, and product pages. We can also confirm this value using the mouse's customization software, if applicable.
CPI Adjustment Steps
We determine the CPI Adjustment Steps by checking manufacturer specifications, including user manuals, press kits, and product pages. We can also confirm this value using the mouse's customization software, if applicable.
How To Get The Best Results
Choosing the right CPI setting
If you use your mouse for work, everyday browsing, or casual gaming
Virtually all mice have fairly wide CPI ranges and are more than accurate and sensitive enough for various uses. If you use a mouse for work, browsing, or casual games, you're extremely unlikely to notice CPI variation or accuracy errors, so your best bet is to choose a CPI that feels most comfortable.
Lower CPI settings are generally more comfortable if you need to make fairly slow and accurate movements. Photo editing is a good example of how a lower CPI setting can be helpful. On the other hand, if you have limited desk space or prefer making cursor movements that are faster but not quite as accurate, you may want to try a higher CPI setting. Note that if you use a very high-resolution display, using lower CPI settings will likely not feel sensitive enough, and we recommend a mouse with at least a maximum CPI of 2000.
If you play fast-paced, competitive games or you frequently use different mice
Most competitive gamers prefer CPI settings between 800 CPI and 3000 CPI. Lower CPI settings give good granular control but require much larger movements, and players using them often need to quickly pick up and reposition the mouse during flicks and wide sweeps. In comparison, higher settings can feel faster and more comfortable for some, but they make precise micro-adjustments more difficult.
It's less of a problem if a mouse has higher CPI variation error values as long as the variation between speeds and CPI settings is consistent. Inconsistent deviations make a mouse harder to adapt to. If you stick to one mouse for gaming, you can usually adjust to its characteristics quickly if its CPI variation is reasonably consistent, and it won't impact your performance. Frequent switching between different mice, especially if one or more have high variation error rates, makes it difficult to build muscle memory and adapt your movements to their inaccuracies.
Also, positive SRAV values are worse than negative ones because a positive SRAV result means your cursor will overshoot more when you flick faster, forcing you to reverse your movement acceleration.
Lastly, despite ever-growing CPI ranges advertised by mouse manufacturers, having a mouse with the highest maximum CPI setting isn't necessarily an advantage. It's more important that the mouse you choose has good variation values rather than the widest possible CPI range.