If you have a Mac computer and want to buy an external monitor, it's important to get a display that works properly with the Mac operating system. Our macOS Compatibility test checks what signals and features the monitor supports on macOS and whether there are any issues that make it difficult to use with the operating system.
We test VRR and HDR compatibility over both HDMI and Thunderbolt connections from a MacBook. We normally use an M2 Pro 14-inch MacBook Pro (2023) for testing, though we'll use an M4 Max Apple MacBook Pro 16 (2024) if the monitor delivers over 96W of power. We also check that the monitor has no issues and test support for certain features, like VRR and the max refresh rate. Support for specific features or resolution depends on the computer's chipset. In addition to covering how we test macOS Compatibility, below, we also cover what capabilities your particular Mac supports.
If you want to find a monitor to use with a Mac mini or MacBook, you can also see our recommendations for the best monitors for MacBook Pro and MacBook Air. You can also see our recommendations for the best monitors for Mac mini and the best monitors for Mac Studio. If you want to buy a laptop from this brand, check out our list of the best Apple laptops.
Test Methodology Coverage
We first began testing macOS Compatibility with Test Bench 1.2. While macOS testing is the same in Test Bench 1.2-2.0.1, we've started including additional information from testing in newer reviews.
As a result, in some reviews, you'll see a written description of VRR, HDR, and power and sleep details. In newer reviews, in addition to this text, you'll also see a table detailing the max refresh rate range, VRR range, and HDR for both HDMI and Thunderbolt connections.
| Test | 1.0 | 1.1 | 1.2 | 2.0.1 and newer |
|---|---|---|---|---|
| VRR | ❌ | ❌ | ✅ | ✅ |
| HDR | ❌ | ❌ | ✅ | ✅ |
| Power and Sleep Details | ❌ | ❌ | ✅ | ✅ |
Our Tests
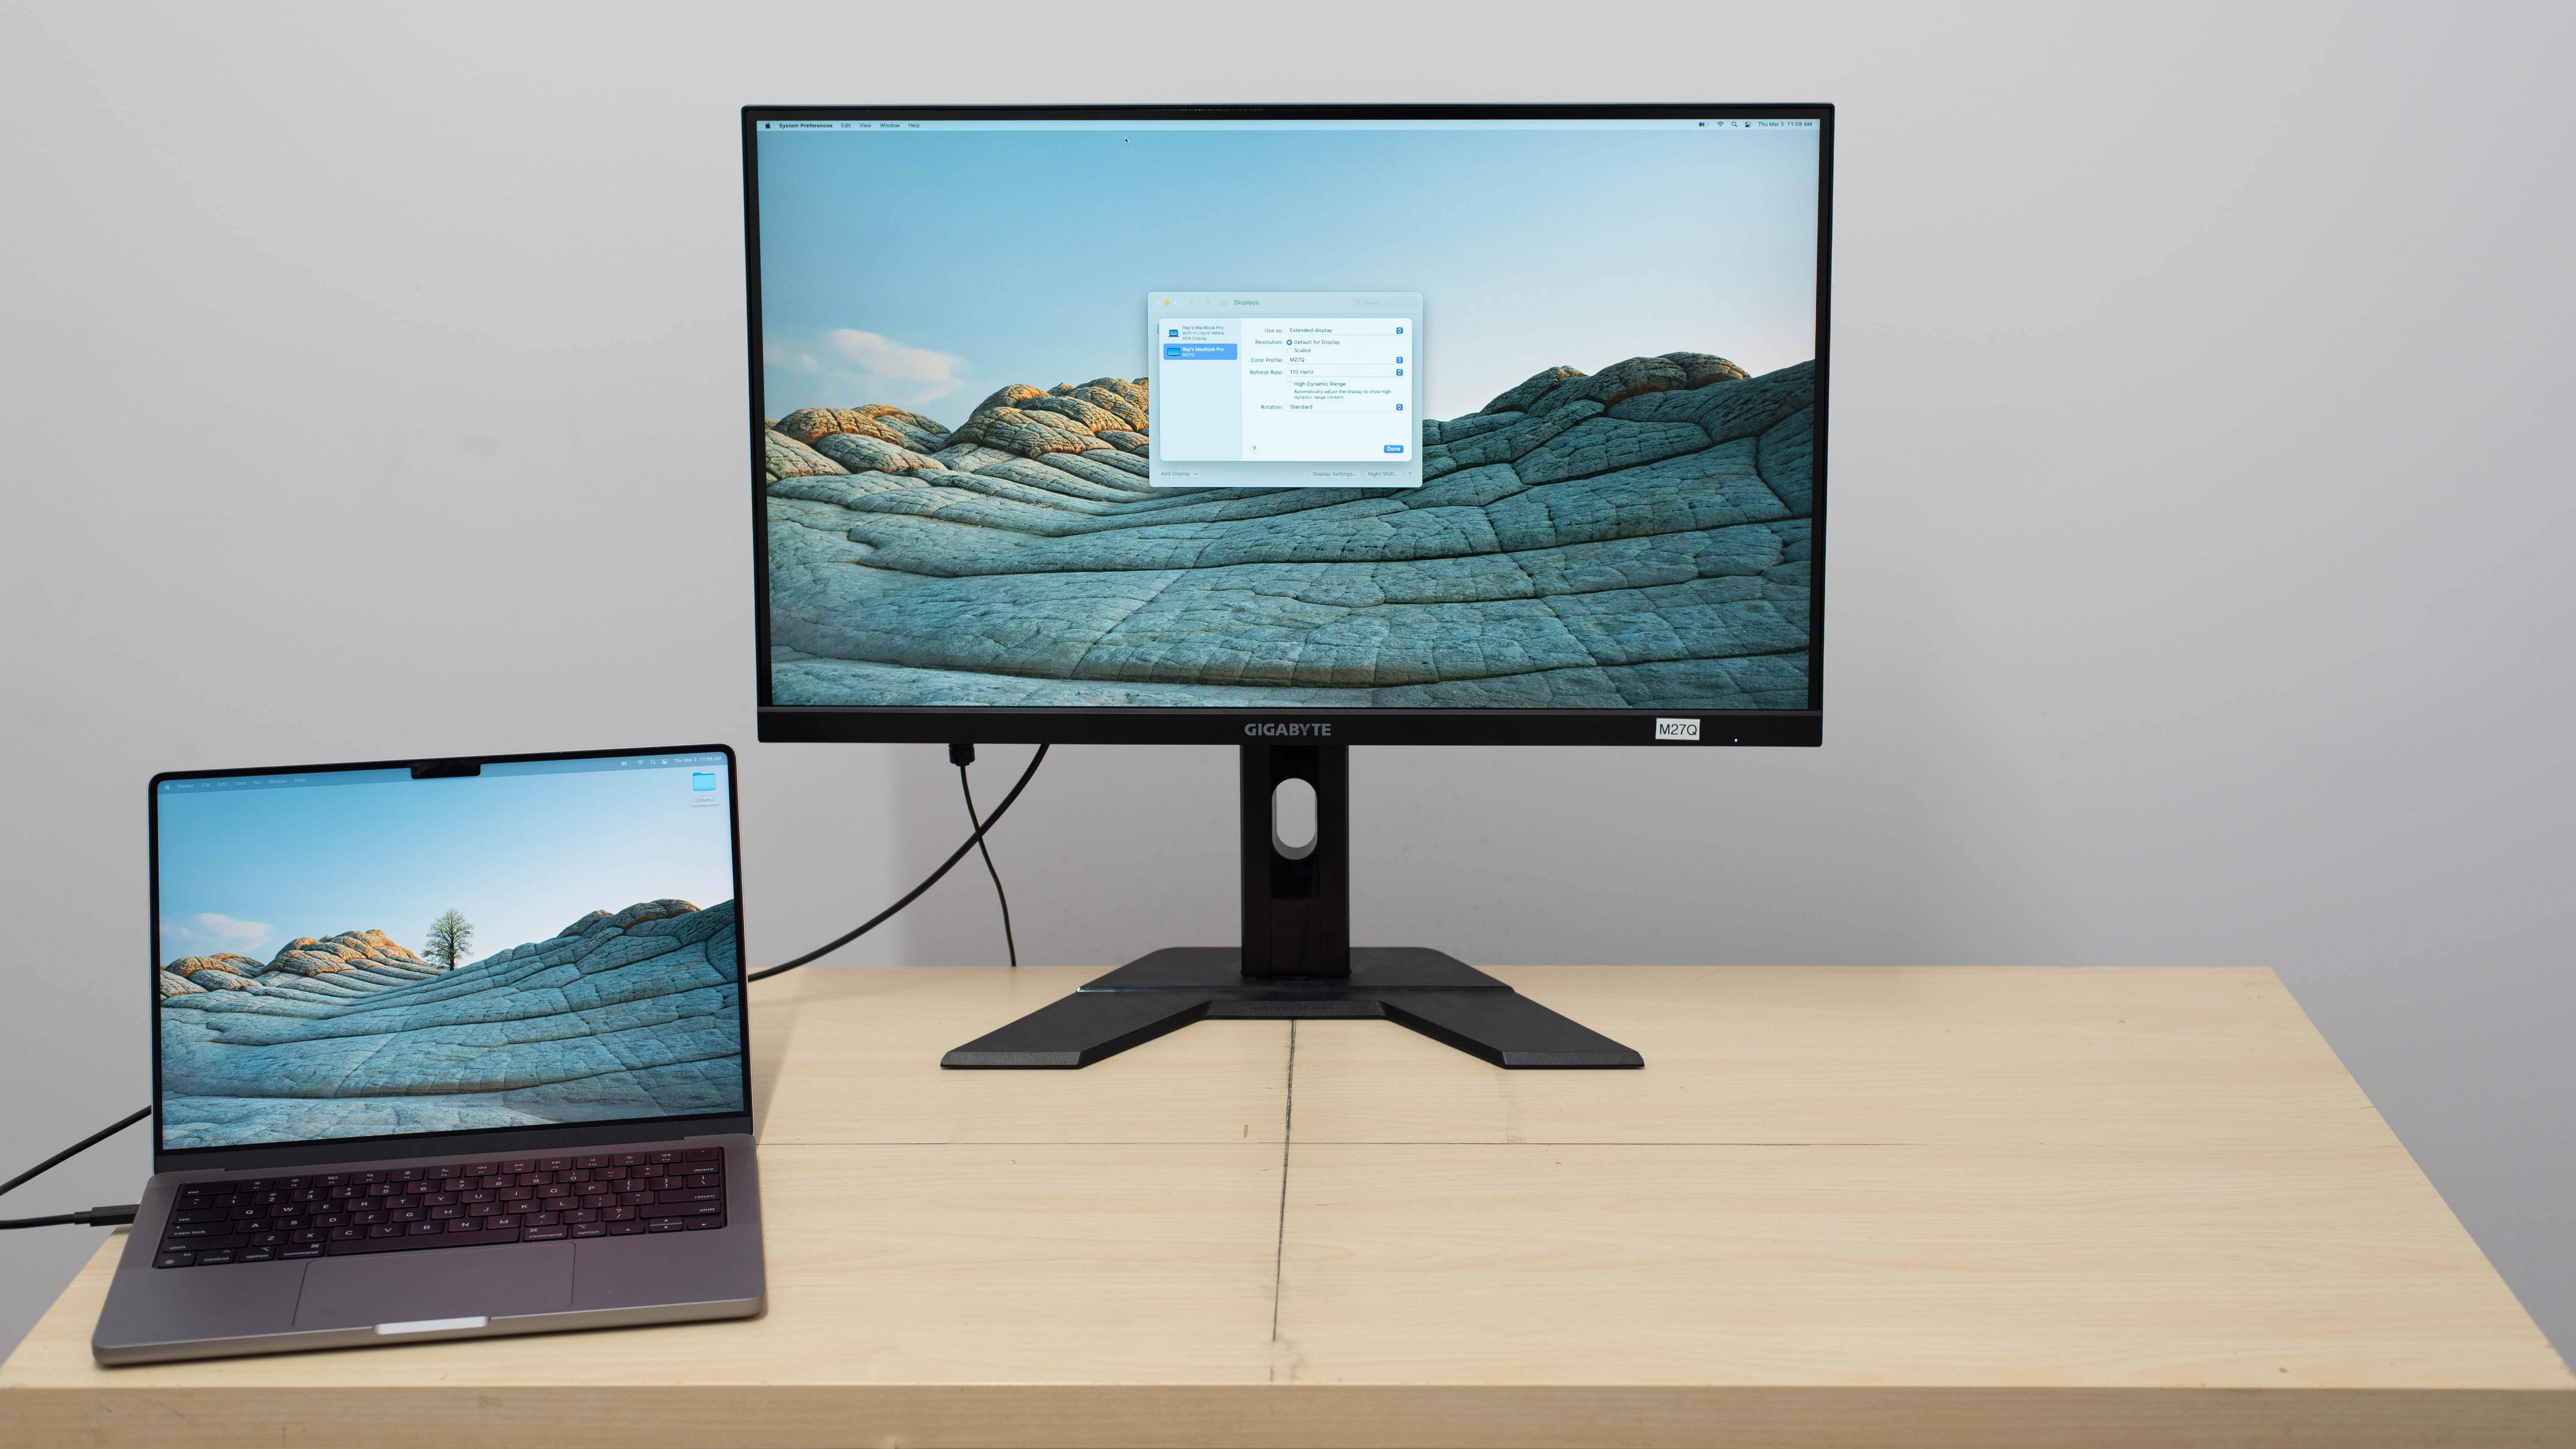
We usually verify HDMI compatibility with the M2 Pro Apple MacBook Pro 14, which supports HDMI 2.1 bandwidth. We also use the M2 Pro MacBook's Thunderbolt port to connect to the monitor's USB-C input. If the monitor doesn't have a USB-C input, we use a USB-C to DisplayPort cable. We check for the max refresh rate, VRR range, and whether HDR works with each connection. We also close the MacBook lid to see if you can continue working on the monitor and then check if the windows return to the original position when reopening the lid. If the monitor provides over 96W of power delivery, we'll test it with the M4 Max Apple MacBook Pro 16 (2024), as it can draw up to 140W of power.
Screenshot And Default Resolution
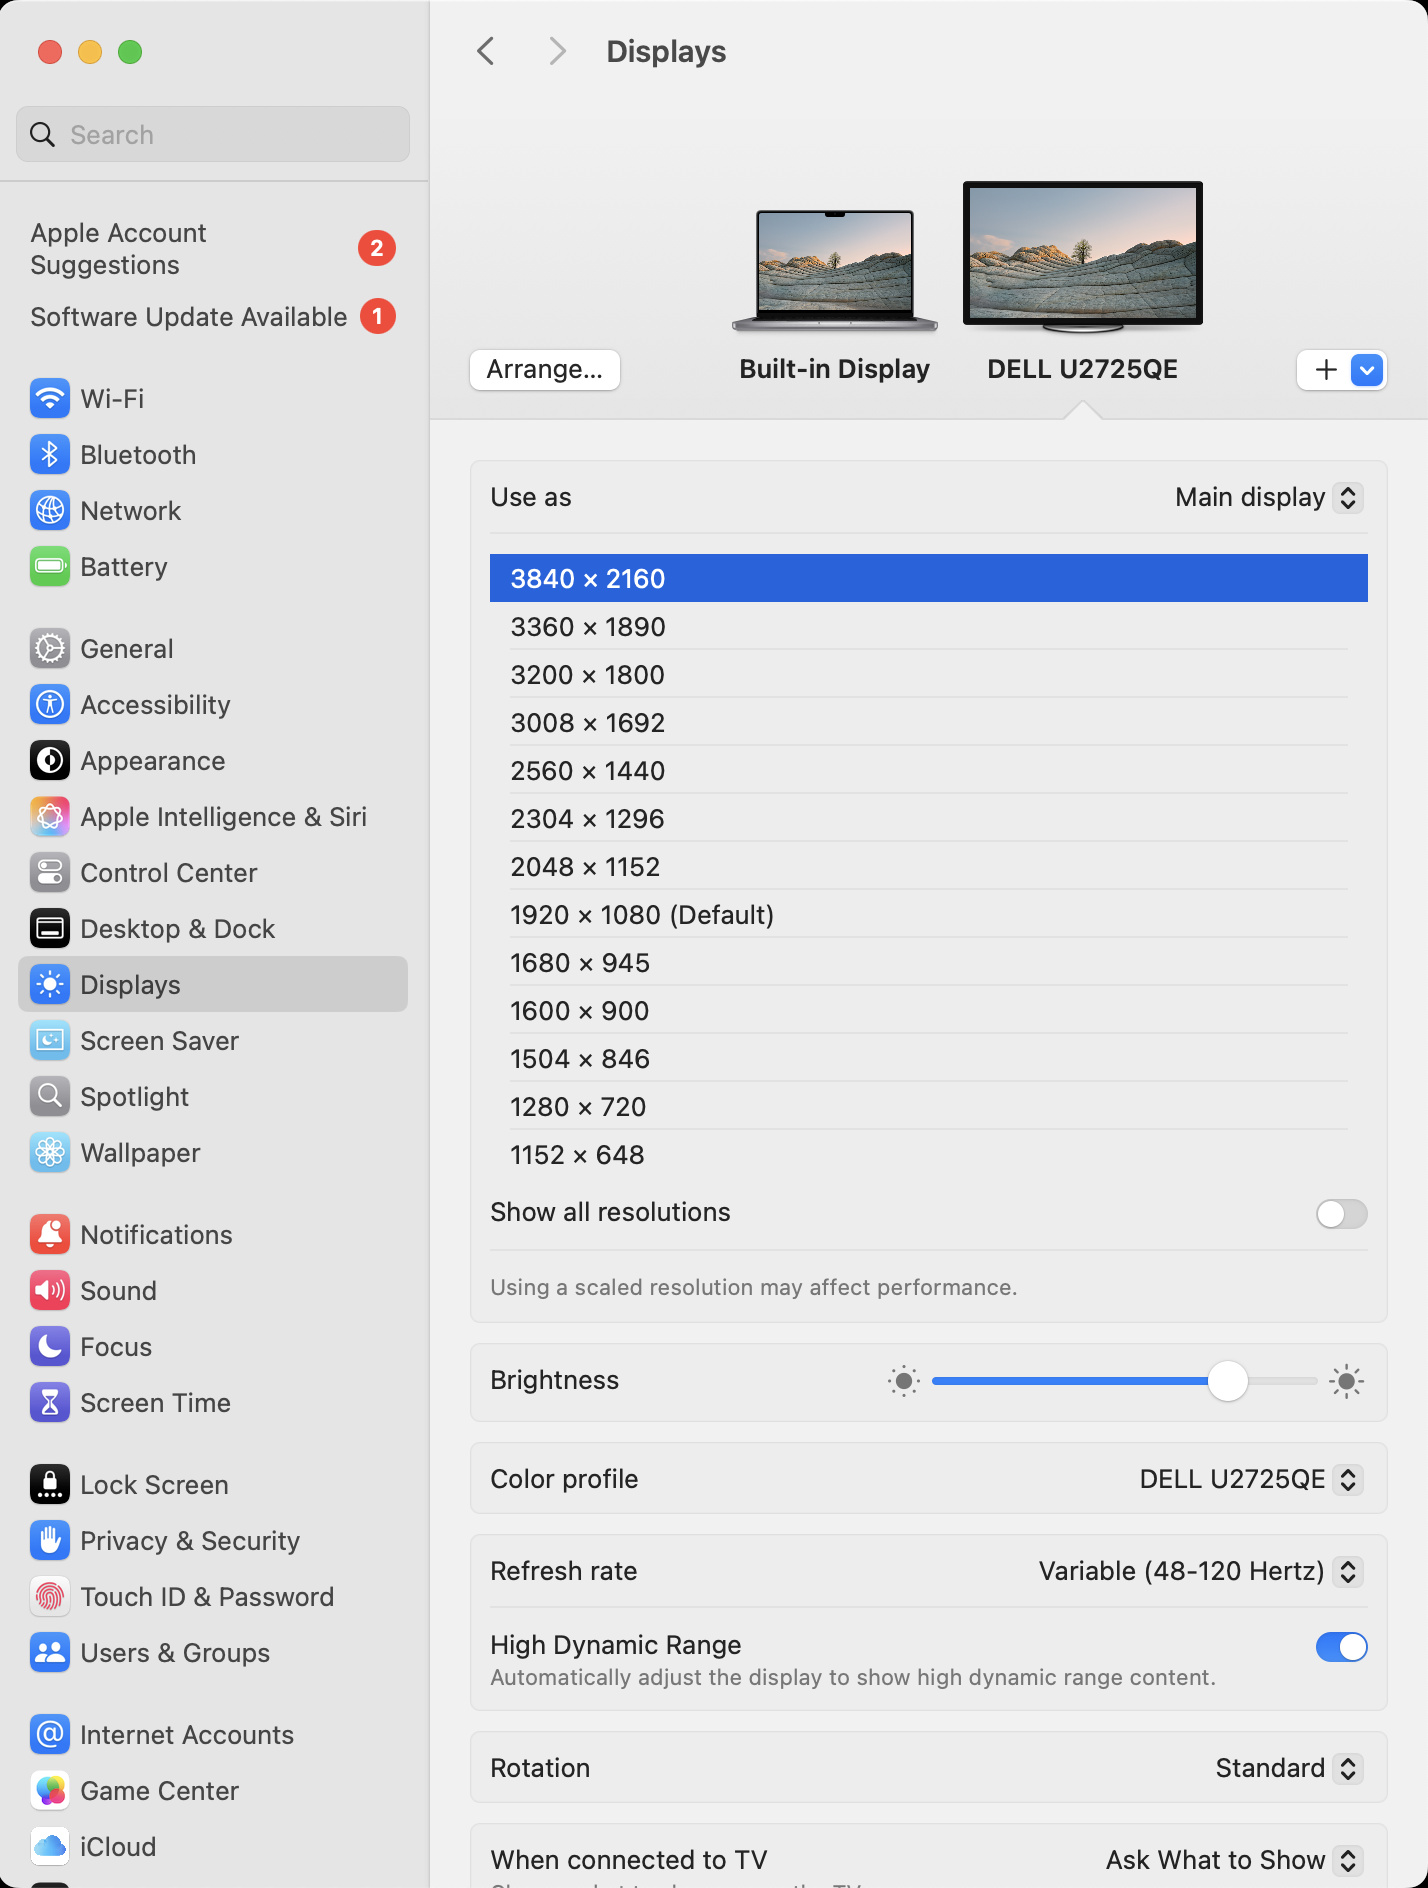
The first thing we check is the default resolution and supported formats. We go to the 'Displays' tab in About This Mac, click on Displays Preferences, and open up Display Settings. We take a screenshot of this page and publish it in our review. Here, you see information such as whether VRR and HDR are supported.
We use the version of macOS that's available at the time of testing the monitor, so we've tested monitors on Monterey 12, Ventura 13, Sonoma 14, and Sequoia 15. This means that the screenshots we include may look different between reviews, especially for older reviews, but the differences are aesthetic only and don't affect compatibility. Below is an example of macOS Sequoia 15's display settings with the Dell U2725QE connected.
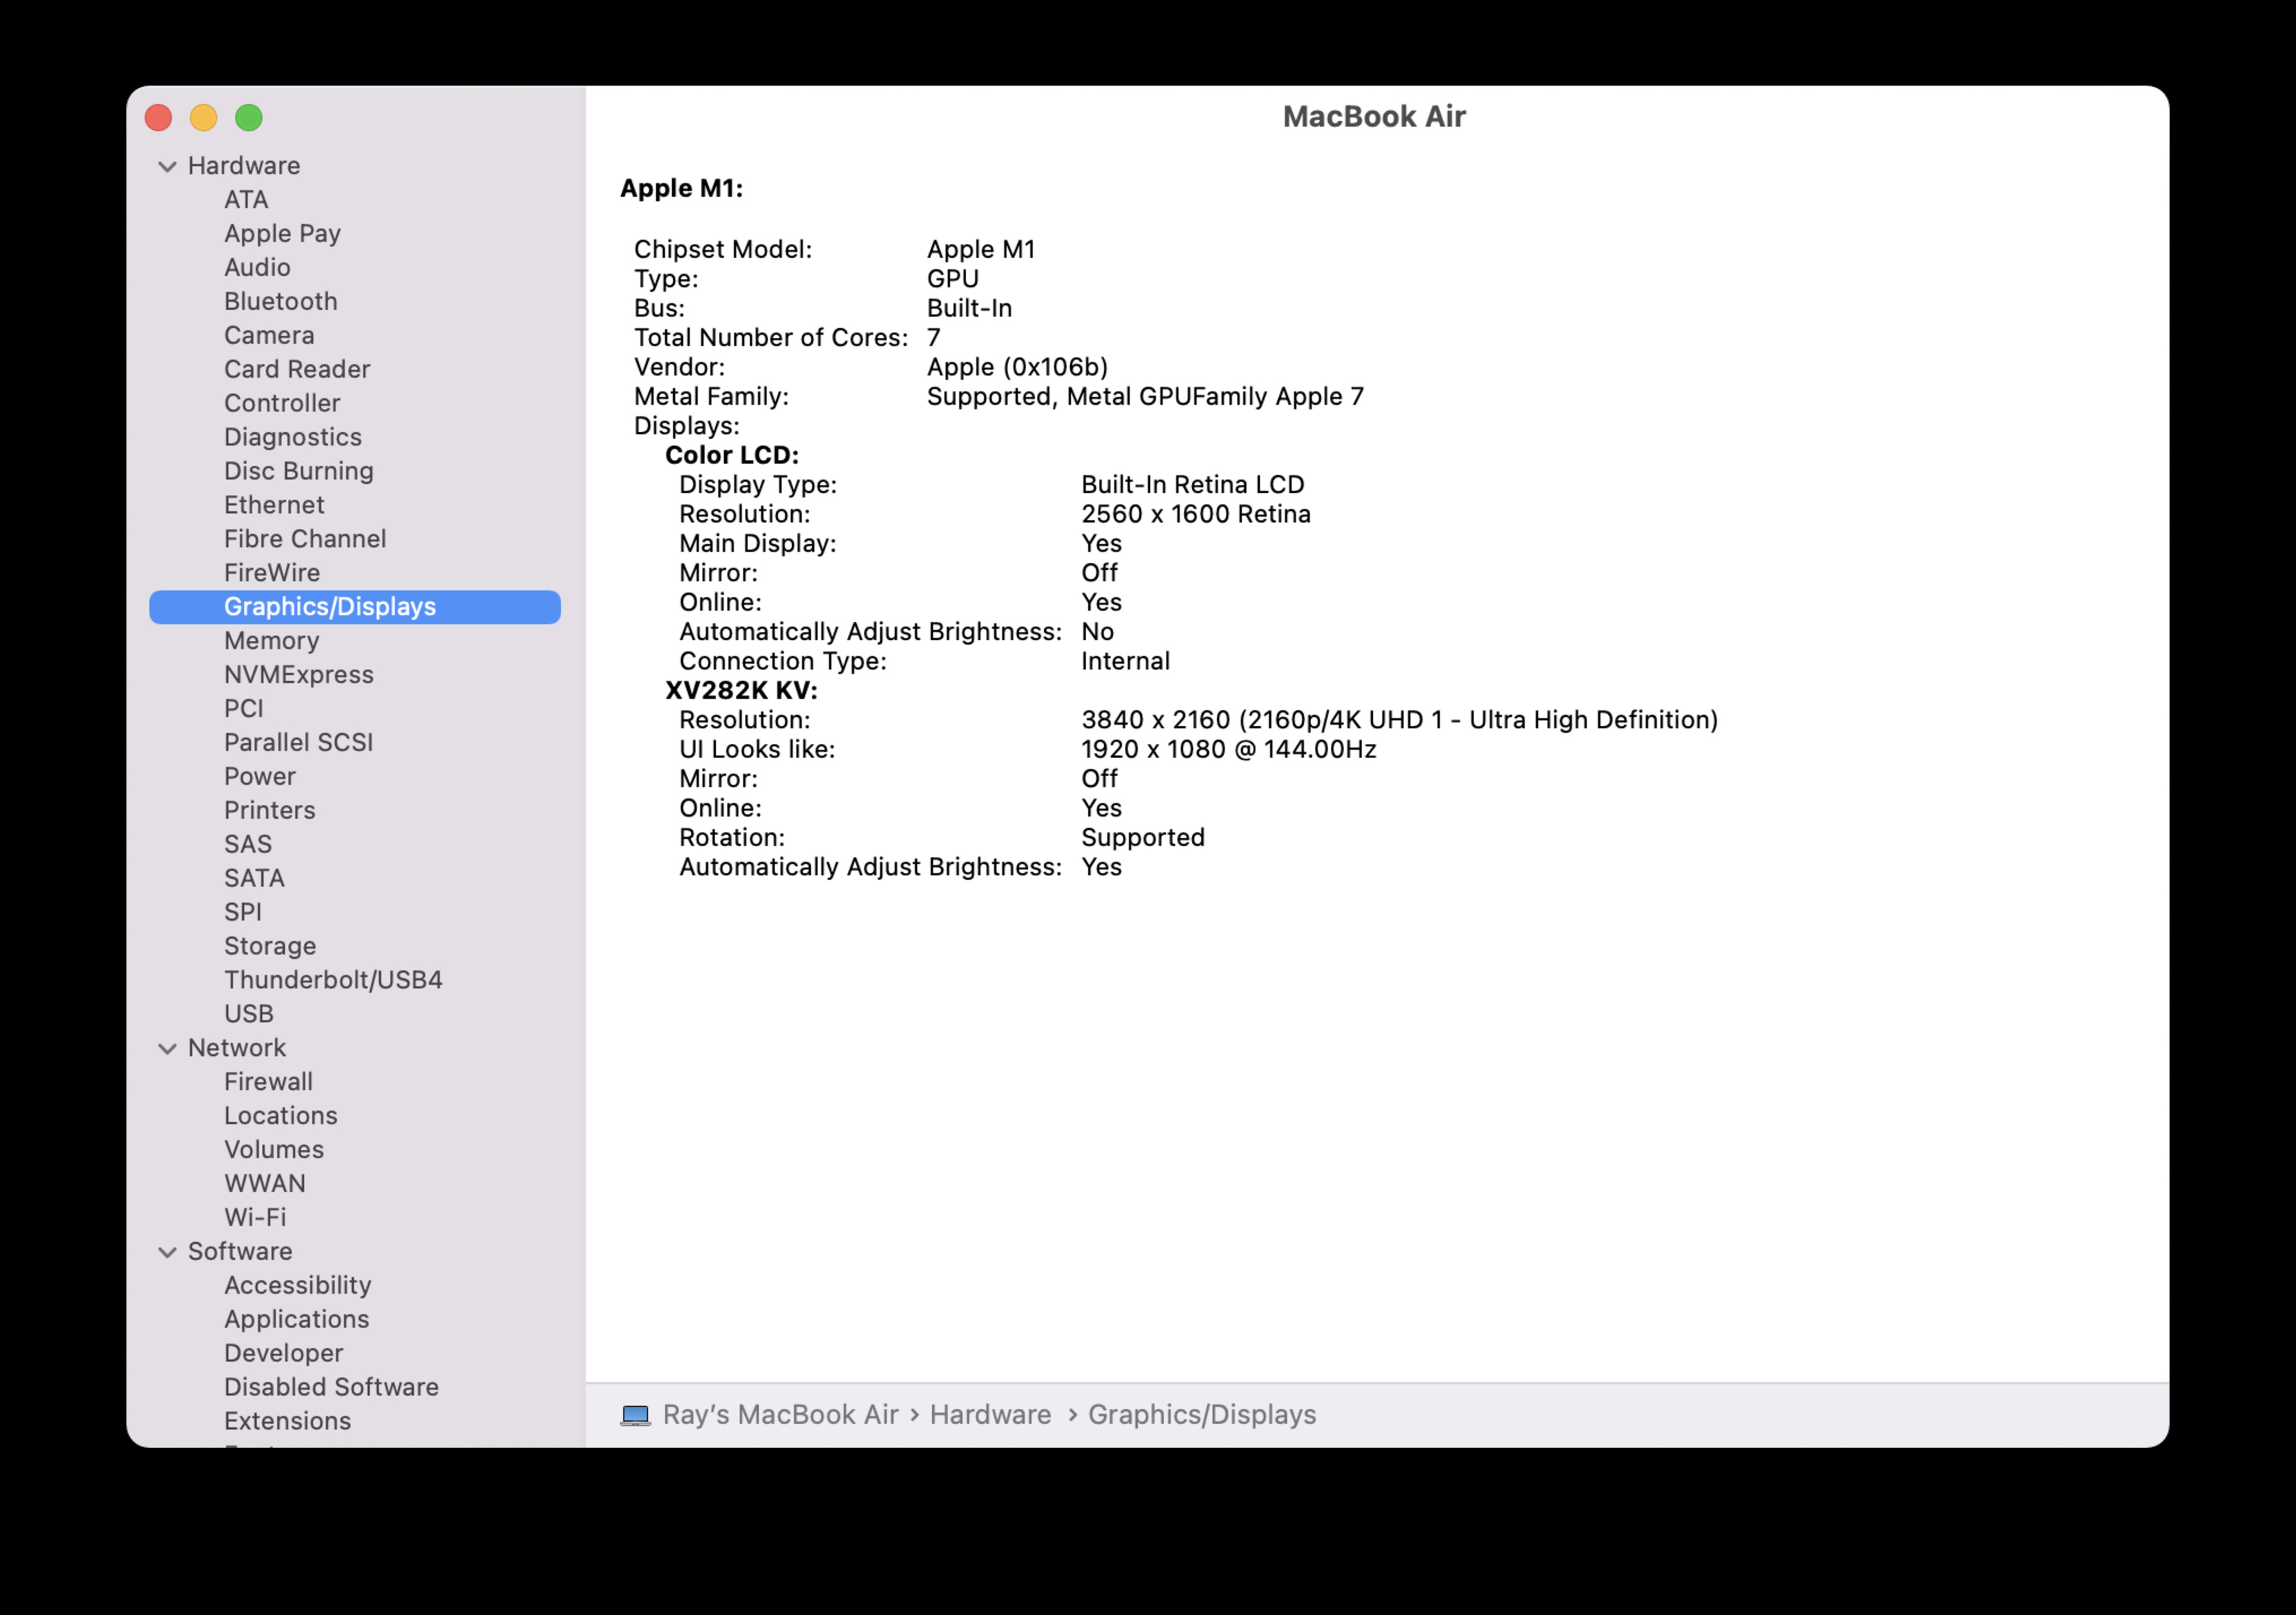
We also check the default resolution of the display when it's first connected to the MacBook. In the 'Graphics/Displays' tab of the System Report, we can see the external monitor's default resolution, which is labeled as 'UI Looks Like.' If this resolution is different from the native resolution of the display, which is presented as 'Resolution' right above it, that means that the monitor isn't displaying the image at its native resolution. When this happens, we need to go back into the Display Settings tab, change the Resolution setting from 'Default for Display' to 'Scaled,' and select the proper resolution. Some monitors require this, but it isn't a big concern. You can see an example of how this looks below:
Refresh Rate
After setting the proper resolution, we check the monitor's maximum refresh rate. We select the highest refresh rate available from Refresh Rate in Display Settings, and then we check the 'Graphics/Displays' tab in System Report to ensure it's running at that refresh rate. We also verify that the native resolution doesn't change, as we only consider the maximum refresh rate the monitor can achieve at its native resolution.
HDMI
The max HDMI refresh rate depends on your Mac computer.
- Intel Macs and M1 Macs don't support HDMI 2.1, so their max refresh rate over HDMI is 60Hz with a 4k monitor or 144Hz with a 1440p monitor.
- M2 and newer Macs support HDMI 2.1 bandwidth and compression, and can reach at least 480Hz over HDMI with some 1440p monitors.
DisplayPort
A Mac's Thunderbolt ports use the DisplayPort protocol to output video from your computer. As a result, the USB-C results in our reviews also apply if you connect a monitor with a USB-C to DisplayPort adapter.
Limitations exist with Thunderbolt connections depending on your Mac.
Intel Macs
Most Intel Macs don't support Display Stream Compression (DSC). This limits the maximum refresh rate.
- 4k: Some older Intel Macs can only support 4k @ 60Hz over their Thunderbolt ports, while some newer Intel Macs support up to 4k @ 120Hz.
- 1440p: Some older Intel Macs support 1440p @ 165Hz over their Thunderbolt ports, while some newer Intel Macs support up to 1440p @ 240Hz.
M1 Macs
M1 Macs also don't support compression, so they have lower maximum refresh rates compared to M2 and newer devices. However, the maximum refresh rate possible can vary by monitor.
For example, with the 1440p @ 480Hz Sony INZONE M10S, the maximum refresh rate over USB-C is 120Hz. However, another monitor with 1440p@ 480Hz capability, the ASUS ROG Swift OLED PG27AQDP, has a maximum refresh rate of 240Hz on M1 devices, so there's a bit of variability in the maximum refresh rates you'll see on M1 devices.
M2 and Newer Macs
M2 and newer Macs do support compression over their Thunderbolt ports, so they can achieve higher refresh rates than Intel and M1 Macs. The maximum refresh rate possible with M2 and newer devices is included with every monitor review.
Intel and M1 Macs Not Currently Tested
As of May 2025, we only test with M2 and newer MacBooks. If you have an older M1 or Intel device, the above performance restrictions apply, even if we don't specifically mention it in the review. In older reviews, you may see testing results with M1 devices.
VRR & HDR Support
If the monitor supports VRR and HDR, we also evaluate how they perform and make any note of issues. We enable both VRR and HDR and open the Shadow of the Tomb Raider demo on Steam. While the demo plays at the monitor's native resolution, we look for any screen tearing, which means the VRR support isn't working properly. We add in the text if there are any issues with the VRR support in the game and on the desktop.
We also check the monitor's HDR performance with macOS, although on some monitors, HDR looks washed out in macOS. Like with the VRR support, we check the HDR performance in the game and on the desktop and note any particularities or issues. Sometimes, there are issues with VRR flickering on the desktop or washed-out colors in HDR. For those monitors, you may prefer to disable VRR and/or HDR while on the desktop and browsing the web.
VRR Support
- Some Intel-based Macs support VRR over their Thunderbolt ports via DisplayPort protocol. None support VRR over HDMI.
- All M1 Macs and M2 (base) Macs support VRR over their Thunderbolt ports via DisplayPort protocol. They don't support VRR over HDMI.
- M2-M3 (Pro, Max, and Ultra) and all M4 Macs support VRR over their Thunderbolt ports via DisplayPort protocol. They also support VRR over HDMI.
HDR Support
- Some Intel-based Macs support HDR.
- All M1 and newer Macs support HDR.
Power and Sleep
Lastly, we test how the monitor behaves when we close the lid of the MacBook we're testing with. We do this to see if you can continue working on the monitor with the lid closed or if the monitor goes to sleep and if the windows return to their original position when we reopen the lid. We also ensure there aren't any connection issues while doing this, like if the monitor loses connection and you need to unplug and plug the laptop in again.
The most common problem is windows not returning to their original position when you reopen the lid, but most monitors don't have this issue. We write how it performs with the lid closed in the text, and if there are any issues.
Additional Information
Why Isn't macOS Compatibility Scored?
Many problems could occur with a Mac connected to a monitor; our verification list isn't exhaustive. There may be problems that we don't notice, but someone else might, and if it's a common problem, we'll look at the monitor again. Unlike other test boxes, like PS5 and Xbox Series X|S Compatibility, we don't score this box because it's hard to assign a score to only a handful of compatibility issues that can occur. If you own a macOS device and want to know how the monitor performs with it, it's best to read the text.
Compatibility With Other Apple OS
This test is only for compatibility with macOS computers if you want to use a secondary screen. While you can connect iPads and iPhones to a monitor via USB-C, our results aren't valid for iOS or iPadOS devices.
USB-C Power Delivery And Thunderbolt
We also test a monitor's Power Delivery in the USB section of the review. This tells you how much power the monitor can send over your Mac's Thunderbolt port to charge your laptop. The exact power consumption of your MacBook depends on the model and configuration, but generally, the higher power delivery a monitor has, the better, as you can charge the laptop's battery while you're using it. That said, the exact power delivery also changes across different monitors, as you can get a monitor with only 15W of power over USB-C or Thunderbolt and another with 140W.
Monitors with Thunderbolt support are optimal for Mac computers, as all recently released Macs have Thunderbolt support. It often provides more bandwidth and power than regular USB, but you can still use your Mac computer via USB-C with any monitor that has DisplayPort Alt Mode support.
How To Get The Best Results
If you have a MacBook, getting a monitor with a USB-C or Thunderbolt input is the way to go for the greatest convenience. This lets you display an image and charge your computer with a single cable, provided the monitor offers enough power.
If you have a monitor with compatibility issues with macOS, this is often outside your control, and there usually isn't much you can do to fix it. If there are issues with VRR and HDR, it's best to disable them until you need to use them.
Conclusion
Whether you have a MacBook, Mac mini, or Mac Studio, a good external display can make a big difference to your experience, and it's good to know how it performs with a given monitor. While most monitors work well with macOS computers, a few have compatibility and display issues. The macOS Compatibility box aims to identify any potential connectivity issues that may happen with a monitor, and we also look to see if features like HDR or VRR work properly. While this box isn't scored like many of our other tests, we write anything that may affect the user's macOS experience in the text.